Showing posts with label hunting. Show all posts

Monday, April 11, 2022

Park Profile: Proud Lake Recreation Area


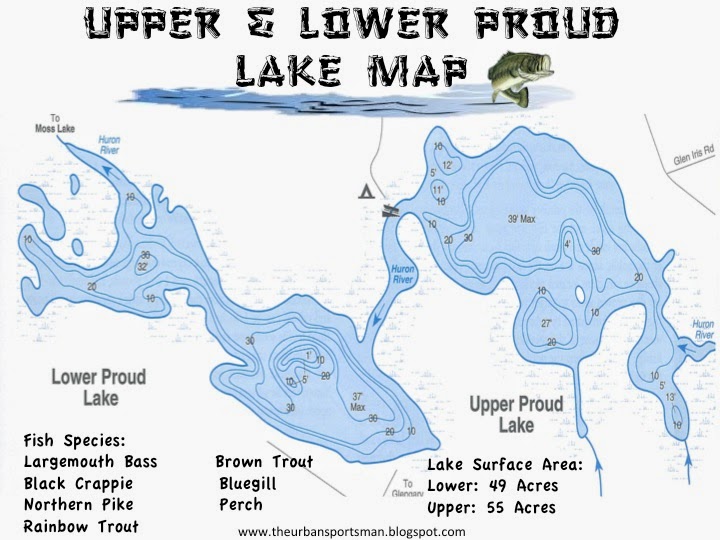
Every day we grind away at work, itching to get to the weekend so we can do something we love.  If you're reading this post then kayak fishing is one of the things you love and you can't wait to get on the water whenever possible. But when you can go kayak fishing, where do you go?  Do you fish in your normal haunts or do you try some place different? Maybe turn your fishing day trip into a kayak camping trip?  Possibly you try someplace where you can target some new species of fish.  No matter what you choose, you have to decide where you'd like to go fishing.

If you're in southeast Michigan, Proud Lake Recreation Area might just be the place you try out next.  With 104 acres of fishable water between upper and lower Proud lakes there are plenty of opportunities for you to land some fish.

Every spring the D.N.R. stocks brown and rainbow trout into the Huron river just below proud lake which draws quite a few anglers eager to catch a few trout on the fly.  Then there is the last Saturday in April which signals the opening of trout season and what some people call stock fest. This is the time when people can catch and keep the trout stocked in the Huron river and Proud lakes. This creates a unique fishing opportunity that only last a short time as anglers tend to fish the river out pretty quickly.  However, don't be dismayed because there are always a few big holdover trout hiding in the depths Proud Lake waiting to be tempted by a wayward crank bait or worm.

If trout fishing really isn't your thing or you just can't make it out to the park in time to enjoy the trout fishing madness, don't worry.  Upper and Lower Proud Lakes are filled with plenty of gamefish including: Largemouth Bass, Black Crappie, Northern Pike, Rock Bass, Rainbow Trout, Brown Trout, Bluegill and Perch.

Not only that, throughout the year the park's 130 camp sites are available for you to get away from home. Especially as the temperatures cool and the and the bugs begin to die off, a fall comping trip is the perfect opportunity to sneak in some hunting as well.  The two lakes are surrounded by 4000 acres of marshes, meadows, bogs, pine plantations, and large expanses of natural forest more than half of which is open to hunting.  Every September small game season opens up the hunting opportunities for game like squirrels and rabbits. Then, October comes around bringing bowhunters into the park hoping for a chance at a whitetail deer. But that's not it, the park is home to wild turkeys, pheasants, and a few species of waterfowl, so check the hunting regulations before heading to Proud Lake to with a shotgun or bow in hand. 

If you're just looking to get your daily dose of outdoors then you might take some time to hike some of the parks 21 miles of trail system.  Walking isn't the only way to explore the beautiful scenery, horseback riding or mounting biking are great ways to increase your enjoyment.  Proud lake even host some very unique experiences year around like midnight lantern walks in winter, to see upcoming events you'll need to "like" the park facebook page.  The park has a very diverse habitat. This makes it an ideal place to bring a camera and binoculars for a little birdwatching.  

Finally, once the snow falls and winter arrives you can do a little cross country skiing or break out the snowmobiles to zoom along the 10 miles of snow mobile paths. 

For more information on Proud Lake Recreation Area: Click Here!


Tuesday, March 6, 2018

Treestand Hunting Safety Tips We All Should Know


We've all heard this one safety tip about hunting from treestands. Always wear a safety harness when hunting from a treestand!  We all tell anyone who's interested in hunting that this is the most important safety facet of treestand hunting.  Howevever there is more to safety than just wearning your harness. Preparation is just as important to insure your safety in the field as wearing a harness.

Like all sports, hunting requires measure of preparation.  Why? Because preparation is the best way to assure that you succeed in the field, and hunting is no exception to that rule.

In a previous hunting post we discussed the different types of treestands, however we never discussed the things required to keep us safe while hunting from a treestand.  That's the purpose of this post, to discuss the different things we need to do, in and out of season, to keep us safe while hunting from treestands.  So here we go:

Before Hunt:
Inspect Tree Steps, Climbing Sticks & Ladders: Whether your treestands and their parts are new or old you should be inspecting every inch of the stands. For me, that means starting with the items that are gonna get me up the tree.  The first things I inspect are any treesteps or ladders that I'm gonna use to climb the tree.   When I'm inspecting my steps and ladders I'm looking for these things:

  • Rust spots - Any places that have rust spots (especially weld points) get sanded down, reprimed and painted with rust inhibiting spray paint.  If it's rusted through too thouroughly then I begin to consider replacing the item where possible.  But my last option is welding replacement pieces on to stands or ladders. 
  • Peeling Grit Tape - Replacing the grit tape the most commonly replaced item on my stands and ladders. For $4.00 at home depot I can replace an item on my stand that will aid me in staying stable when I'm hunting in wet conditions.  A couple minutes to peel the old tape off a wipe down with some soap and water or goo-gone to remove the excess old glue and I'm good to go to add the new grit tape. 
  • Broken, Rusty or Defective Nuts & Bolts - Any nuts and bolts that are rusty, broken or defective get replaced immediately.  However I don't just go to walmart and buy nuts and bolts of the same size. I go to a hardware store and try to match the nuts and bolts exactly and spray them down with rust inhibitor before placing them in my stands. 
  • Frayed or Cut Straps - If the straps that hold my steps or ladders have any wear or rips in
    them I replace them immediately.  A trip to any craft store and I have more than enough feet of straps to replace the ones that are damaged.  Simply by replacing the straps you are making sure your tree steps are stands dont shift or fall upon having your weight added to them. 
  • Damaged Ratchets - Since ratchets are the only moving parts on your tree steps, climbing sticks or ladders I make sure I'm meticulous about checking for rust every where.  Since this parts move that means there will be a combination of friction and rust which can team up to give me a bad fall if not taken care of.  So any damaged or rusty ratchets get the boot and replaced. In the case of the straps that have plastic strap adjusters that cause the straps to lock into place, if they are cracked I replace those as well.  Joann Fabrics and Michaels craft stores carry the plastic strap adjusters in any size you need. 


Inspect Harness (Continuously): Your safety harness is the only thing stopping you from coming to an abrupt halt if you fall from your treestand.  As a result it is the most important item in your hunting gear and as such needs to be checked continuously for damage.  In the case of my safety harnesses, if they have any damage I dont repair them I replace them.  However in the case of vest style full body harnesses miner wear and tear can be fixed via your local taylor. Also they carabiners that lock to the tree can easily be replaced but if you're going to replace them don't skimp on carabiner.  Go to a store that sells professional climbing gear and get a good one.  You won't be upset with what you get, the carabiners that rock climbers use are equal in strength to the originals or stronger and ofter much lighter in weight.

Inspect and practice with your linemans belt: If you're like me and end up placing multiple stands each year or your use portable climbing sticks to hang stands on public land, you'll want to learn how to use a lineman's belt.  Pretty much what lineman's belt does is climb with you while you'r ascending and descending your tree.  Why is this important? Because most falls from a treestand occur when you're climbing up or descending your tree and the lineman's belt gives you a lifeline during those times. So if you're using a lineman's belt You're checking for the very same things that you are on safety harness.  Below is a video of who you can make your own lineman's belt and below that is a list of the materials need with links to where you can purchase.


Lineman's Belt Materials:
  • 11mm static mountain climbing rope click here
  • Ropeman ascender  click here
  • 7mm static mountain climbing rope if using a prusik knot click here
  • 3 Aluminum climbing carabiner click here


Practice Setting Up and Using Your Stands: Once you've checked and repaired all of your equipment the next thing that should be on your list of to do's is to practice using your stands and harnesses. Practicing setting up my stands before the hunting season helps me in a couple of ways.  First it gets me familiar with the parts of my stands thus making it easier to set them up quickly and quietly when I'm in the field.  Secondly when it comes to my climbers and hang on stands it allows me to see if there are any things I can do eliminate unecessary noise produced while setting up or walking to stand.

Practice Self Rescue: The worst thing that can happen while you're out hunting is that you can fall out of your stand.  Even with a harness falling from a stand can be a painful ordeal not only that but a difficult ordeal to get yourself out of.  So one of the things I do is I practice self rescues with all of my gear on before I get into the field.

By practicing self rescues you learn more than anything what you need as an outdoorsmen or woman to keep yourself safe up in the tree.  While hanging a safe distance from the ground you'll learn if you're muscles are not capable of pulling yourself upright.  Also you'll see if, upon a fall, your harness will actually keep you from hanging upside down and if not you'll quickly start trying to trouble shoot this problem.  You'll also learn if your upon a fall you'll learn to recognize how high you should have your tether rope attached to the tree.  By knowing this you can place your tether rope at a height that makes it easier for you to get back into stand safely.

Lastly, by practicing self rescues you'll give yourself the knowledge to quickly get yourself back on stand after a fall without having to do any major problem solving. Hopefully because you've seen all of the possible problems that could happen from a safe height.


During Hunt:

Select safe tree
The first part of selecting your tree is knowing what you're looking for in a tree.
1. Look for trees that are alive, so dont climb trees with dead limbs or that are wrapped in vines.
2. Choose straight trees or trees that lean slightly backwards
3. For Climing Stands avoid trees with smooth bark that have bark that strips off easily


Once you've selected your tree make sure you take time to climb your tree before actual hunting season starts.  This will give you the opportunity to do a these essential things:

  • check for any shooting lanes that need to be cut from your line of sight.  
  • clear any limbs that will stop you from getting to the height you want to hunt from. 
  • Install any screws or hanging aids you'll need while hunting
Once you've set up your treestand and are ready to get into the field. Make sure when climbing you're using the 3 point rule when ascending or descending stand.  (Three limbs are always in contact with the tree) Not only this but make sure you're using your linemans rope and climbing without your equipment attached to you.  Any equipment attached to you when you're climbing your tree can throw off your balance causing you to fall.  Simply use a haul rope for your extras, it'll save you pain and expense in the long run. 

When not to hunt from a treestand. 
  • If you're already fatigued dont hunt from a treestand.  Fatigue can be a killer if you need to practice a self rescue from 20 feet up. 
  • Finally if you it is raining with thunder and lightning do not climb up into a metal stand making yourself into a giant lightning rod. 


Quick Tips:
  • If using strap on tree steps, leave your highest steps in the tree so you have less to put up in the darkness when hunting. 
  • Set up your tree steps a couple of feet above your stand so you can step down into the stand rather than pulling yourself up. 
  • Use screw in steps for hanging equipment above your stand, not as steps to climb
  • Screw in steps can shatter under extremely cold conditions
  • Screw in steps set below your stand can inpale you if you fall from your tree
  • If you're using a climbng stand ascend and descend only 12 inches at a time
  • A small piece of carpetting on the stand floor quiets the stand, warms your feet and makes it less slippery
  • Make sure someone knows where you'll be hunting and how long you'll be hunting
  • Always wear a safety harness when hunting from a treestand 

Friday, October 7, 2016

Understanding Hunting Treestands


At some point as a hunter you have to make the decision whether or not you'll be hunting on the ground or from a tree.  Early on you'll notice the pros and cons of hunting each way.  Pros like the flexibility of being able to move on the fly when you're hunting on the ground or the greater field of view from a treestand. Whatever your considerations, at some point you'll need to know whether you'll be hunting on the ground or from a tree.  For those times when you feel it's best to hunt from an elevated position, here is a brief overview of the different kinds of treestands with their pros and cons.


Ladder Stands

Description:
Ladder stands are treestands where the ladder, platform and seat are all connected. They're a perfect option for hunters who have no intention of moving the stand throughout the season.  Ladder stands are also a great option for hunters with a moderate to lower fitness level becuase the larger ladder makes it easier to climb. As well they offer very stable platforms for standing or sitting because the stand is always seated on the ground.

Ladder stands have the largest platforms and seats of the four kinds of treestands.  In fact some ladder stands are large enough to seat two hunters at once which is great if you're hunting with a kid, someone inexperienced or filming a hunt.

Pros:
  • Ladder stands are comfortable with large seats and platforms.
  • Some ladder stands can seat multiple hunters.
  • Ladder stands are very stable
  • Ladder stands are quiet due to the lack of moving parts.
  • Ladder stands are relatively easy to climb
  • Ladder stands have the highest weight capacities 


Cons:
  • Ladder stands are heavy 
  • Ladder stands require to people to erect
  • Ladder stands are not portable


Tips:

First, ladder stands have heights between 15 feet and 18 feet.  This limited height leaves your feet standing at about 12 feet from the ground leaving you within the edges of a deers peripheral vision. So consider setting up ladder stands on hill above whatever travel route you're hunting. This will get your farther out of a deers field of vision view while increasing your own field of vision.

Second, set ladder stands up in trees that have large low hanging branches whenever possible.  The large branches will break up your sihlouette and camoflage your movements.

Third, make sure the trunk of the tree you're setting up in is at least the same width of the ladder portion of the stand. This will help you and the stand go unnoticed by any wary deer.

Lastly, add brush and fallen branches around the base of ladder stands to give them more cover.


Hang On Stands

Description:
Hang on stands are one piece treestands that connect to the tree with either a chain or straps.  Hang on stands have small seats without seat backs, with a few exceptions.

Due to their small size and low weights hang on stands are pretty easy to move and erect without the help of another person.  Hang stands require climbing sticks or screw in steps in order to get into whatever tree you choose.  These climbing aids can be cumbersome, noisy and time consuming to attach your tree of choice, which will slow you down if you want to change trees on the fly.

On the other hand the versatility of hang on stands is where they shine.  Hang on stands can be placed in any tree you choose. If the tree is too large or shaped in an odd way, you can simply change out the chain or straps that support the stand with ones that will fit your favorite tree.

Pros:
  • Hang on stands are portable.
  • Hang on stands work on any tree.
  • Hang on stands are light weight.
  • Hang on stands are easy to set up with one person.
  • Hang on stands are not easily detected in the tree. 


Cons:
  • Hang on stands have small platforms and seats
  • Hang on stands require climbing sticks
  • Hang on stands are not comfortable
  • Hang on stands can be easier to fall from

Tips:

First, attach shoulder and waist straps to the platform to make hang on stands easier to transport to and from the field.

Second, make sure you purchase the lightest weight stand you possibly can. The less the stand weighs the less fatigue you have from moving it around and setting it up.

Third, use the best and lightest ladder system you can afford. By doing this you'll make your in field set up faster and make trasporting stand far more enjoyable.

Fourth, walk around with your stand and listen for any places that make noise from metal on metal contact. Once the noisy places are found, wrap them in parachord or heat shrink to eliminate the noise made by metal on metal contact.

Lastly, always do a safety check on your hang on stands before and after the season.  When doing this check for rusted bolts, chains, frayed straps or anything else that can potentially be a hazard.

Climbing Stands

Description:
Climbing stands are treestands that have two individual parts that aid hunters in climbing trees.

Climbers tend to be a bit heavier than hang on stands.  However they make up for that weight with comfort and mobility.

Mobility is what makes climbers a great choice for public land hunters.  Climbers allow public land hunters to move quickly and easily if necessary.  Pretty much for a climbing treestand to work all you need is a straight tree between 8 inches and 22 inches in circumference and you're good to go.

Pros:

  • Climbing treestands are highly portable
  • Climbing treestands are light weight
  • Climbing treestands are easy to set up
  • Climbing treestands are comfortable


Cons:

  • Climbing treestands can be noisy when climbing
  • Climbing treestands are limited to straight trees
  • Climbing treestands are limited to trees 8" to 22" in circumference
  • Climbing treestands have small platforms like hang on treestands
  • Climbing treestands require a moderate fitness level to use


Tips:
First, purchase the lightest climbing stand you can afford because you'll be carrying it on your back quite a bit.
Second, attach a set of backpack and waist straps to your stand to make transporting it easier and more comfortable.
Third, make sure you walk around wearing the stand prior to hunting and listen for any metal on metal contact.  The places that have the sound of metal on metal contact, wrap them in parachord, heat shrink or bike tire rubber to silence the noise.
Fourth, scout your area heavily before hunting so you can pick out possible trees before getting in the field.  There is nothing worse than trying to find a suitable tree in the dark.
Lastly, practice setting up your stand and climbing trees prior to hunting.  This practice will help you when you have to set the stand up and climb a tree in the dark.

Tower Stand

Description:
Tower stands are not treestands.  Unlike treestands they are free standing and dont require a tree for set up. Some of them are just a tripod with a seat on top.  Some tower stands even have small blinds that sit on top for the users.

The main benefit of tower stands is that they can be set up anywhere. In fact they are ideal for areas that have no suitable trees for treestands, like scrublands.


Pros:
  • Tower stands are free standing 
  • Tower stands can be set up anywhere
  • Tower stands are comfortable
  • Tower stands are easy to climb


Cons:
  • Tower stands are heavy
  • Tower stands require 2 or more people for setup
  • Tower stands provide no cover
  • Tower stands are noisy to set up
  • Tower stands are not portable 


Friday, January 8, 2016

Bear Archery Reverse Limb "Bear X" Crossbow


So I've been considering getting a reverese limb crossbow for the last few years.  Ever since I had the opportunity to use one of Horton's original reverse limb bows a few years ago.  Since then Horton has went out of business and been acquired by tenpoint which shocked me considering how l long Horton has been around.  I figured with the acquisition by Tenpoint the price point of reverse limb bows would go up from what Horton originally had as an affordable bow option.  

Well, I'm happy to say that there is a new option for reverse limb bows out there.  The "Bear X" made by Bear Archery.  I'll be looking into this one for sure this year since I've had nothing but good products from Bear products.  In fact my first bow was a Bear Epic which I still have and hunt with til this day.  Here is a quick video of the "Bear X" produced by Grand View Outdoors.   Also photo credit is to Grand View Outdoors. 


Saturday, January 2, 2016

What's In Store for 2016!


HAPPY NEW YEAR!!!  We made it to 2016 and with the coming of the new year I've diceded that I want something more out of my outdoor addiction.  Where in the past few years I've been hunting and fishing for fun and relaxation I've decided that this year I'd take my time afield more seriously.  So instead of just taking time away to fish, from this point forward this my time afield will be not just fun but filled with challenge and adventure.

For starters I'll be challenging myself to catching and recording master angler class fish from each of Michigan's game fish species.  Not only do I want to do that but catch master angler class fish with both traditional spinning gear as well as fly fishing tackle.  This will be great challenge for me because I consider myself to be nothing more than a novice at fly fishing.

As well as working to catch master angler class fish, I'll also be challenging my creative abilities by getting better at fly tying and lure making.  Currently my fly tying and lure making have much to be desired in the beauty department.  As well I'm pretty limited in the amount of flies that are in my tying arsenal.  So as I practice and get better I'll be posting the flies and lures in addition to their recipes here on the blog.

Lastly this year will be one of exploration for me.  I'll be exploring as many of the lakes and rivers here in Michigan as I can as well as branching out into Ohio.  These trips will be highlighted here on the blog as well as on my youtube channel, which I'll be getting started on again. Hopefully many of these trips will be Kayak camping trips as well so look out.

Tight Lines and Happy New year!

Tuesday, September 15, 2015

Understanding Binoculars Pt.1 What Size to Buy


If you're like me at some point or another purchased binoculars or looked into purchasing them. Unfortunately when you walk into whatever store you've decided to purchase your binoculars from and see the wide range of options it can be a bit overwhelming.  So I've decided to write two blogs in order to make your decision much easier.  This one is the shortest of the two and it's simply about narrowing down your choice based on what size you need for whatever activity you'll be using your binoculars for.

Compact Binoculars (Common Size 8x25, 8x25): 
Pros:  Compact Binoculars are the smallest of the three sizes which make them easy to travel with and give you less fatigue due to the low weight.  Compact binoculars are perfect for hiking, hunting, bird watching, event viewing and travel where you may not be willing to carry large and costly optics hanging around your neck. 

Cons:  Most compacts have objective lenses of between 25mm to 28mm.  Which means the smaller objective lenses cannot gather as much light as ones with larger lenses and so with all else being equal they will usually not produce as bright an image, which is especially noticeable in poor light conditions.


Mid-size (Common Size 7x35, 10x32):
Pros:  Mid-size binoculars tend to be a little more popular than their smaller and larger counter parts.  Mostly because they're a bit of a balanced option between the two.  The larger objective lens gathers more light which makes mid-sized binoculars a better option for low light usage like hunting in dense woods or early morning surveying.  As well the larger lenses also make mid-sized binoculars far more forgiving to unconscious movement than compacts which are harder to focus and find subjects when moving.  Lastly mid-sized binos have  larger field of view than compacts which gives you a larger viewing landscape making it easier to locate subjects.  Mid-sized binos are a good choice for hunting, bird spotting when fishing, bird watching, 3d archery, hiking and just about anything else you wanna do considering the weight of the binos.

Cons: On the other hand mid-sized binoculars are a bit more cumbersome to carry around when travelling thus not really a binocular you'll be taking on your trip to Europe this year.


Full-size (Common Size 8x42, 10x50):
Pros:  Full-sized binoculars take the strengths of mid-sized binos and amplify them.  Full-sized binoculars give you the larger viewing range and depth of field of the three sizes of binos.  Also they are the most forgiving of movement allowing you to find your subject easier.  The large depth of field and long range is what lends full sized binos to being the go to option for whale watchers bird watchers who are watching birds that are hard to get close to like raptors that nest in high trees or rock facings.   Full sized binos are also a good option for spot and stalk hunting where they are a great alternative to using a single I spotting scope.

Cons: With full-sized binos the size is definitely the biggest con.  Some are not small enough to hand hold and definitely are too cumbersome to travel with.  With some full-size binos you'll definitely need a tripod, bipod or monopod to use effectively.  Otherwise my suggestion is to hit the weights if you plan on free hand using them.

With any binoculars you get what you pay for, more expensive binos will often times have higher end lenses with different coatings which cut back on glare, allow for more light to be brought in and have increased clarity of image.  So keep in mind that the basic differences based on size are just a base of information when it comes to functionality in binoculars.  I'll be sure to go more in depth with the other differences that will help you make educated decisions in the next blog post about understanding binoculars.

Thursday, March 5, 2015

A Quick Visit to the New Field & Stream Store In Michigan


    So I had a bit of free time today and decided I'd take a trip out to the new Field and Stream store that just opened here in Metro Detroit.  When I pulled up I expected the parking lot to be overflowing however though it was very close to being full there were a few spots available up close.  I believe this was because the soft opening was earlier this week and not really publicized like the actual grand opening which is set for March 26th.  On that day I'm sure there will be a lot of shoppers taking in all that the Field and Stream store has to offer.


When you walk in to the store you’re greeted by a beautiful mount depicting a pack of wolves fighting with a brown bear over a moose carcass.  Not only are you greeted by that scene but there is someone at the door to great you with a smile and answer any questions you may have. 

As you walk down the center aisle it situated much like a Cabelas or Basspro store with clothing on either side of the path leading you down the aisle to a mountain of mounts at the rear of the store.  The mountain is absolutely beautiful as you’d expect with a myriad of animals looking down at you from various positions and poses. 

From the mountain a quick turn right and you’re headed straight into the fishing area which is where I headed.  Field and Stream has no shortage of fishing product for you to browse through and purchase. The rods and reels are all situated by brand in the back right corner of the store while aisles of baits are situated by use just like any other large outdoors store.  However unlike some of the larger stores they have a pretty decent selection of fly tying materials for those of us who tie and fly fish.

Once you’re done in the fishing section and making your way to the front of the store between the fishing sections you’ll head right through camping supplies and into the area with canoes and kayaking supplies.  For those of us who kayak fish they have a pretty good selection of supplies for us.  From what I see their primary brand is Old Town but I’ll have to do a bit of research to see if that is who makes their F&S brand yaks and canoes.

When you head across the store you head over to the hunting section which has a large selection of hunting equipment.  For those of us there a small archery range for trying out bows and crossbows.  Of which they carry quite a few. When I was there they were giving turkey calling demonstrations which was pretty interesting for me the novice turkey hunter. 

As for the gun section they have a large section of firearms to choose from.  And guess what?  Field
and Stream has ammo for everything including the every elusive .22 rimfire.

All in all the trip was well worth it especially since I was able to snag some Berkley trout bait for the trout fishing opener at Proud Lake this year.  I’ll definitely be going on for the actual grand opening on the 26th of this month.


Field & Stream
Oakland Mall
750 W. 14 Mile Road
Troy, MI. 48083
(248) 581- 8028

Hours:
Monday - Saturday 9am to 9pm
Sunday 10am to 8pm


Tuesday, December 24, 2013

Product Review and Tips For Using The Zippo A-Frame Hand Warmer


Description: The Zippo A-Frame hand warmer is a low odor hand warmer with a long warming life of 12 hours per fluid filling making it ideal for hunting, snowmobiling, skiing, ice fishing and football.  The product includes hand warmer, warmer bag and filling cup.  (Lighter fluid not included)

Review:  This is one of those products that I can't say enough about.  My first time hunting my mentor let me use one of these to help me keep warm on a day that was a very cold 11 degree day.  At first I thought I didn't need it because i had some of those disposable hand warmers.  However after an hour of sitting I quickly noticed the difference in heat being produced by disposable hand warmers and the Zippo A-Frame warmer.  Needless to say the Zippo hand warmer was far better at producing warmth and it lasted several hours longer than the disposable warmers. Not only that but it it had no odor that I noticed.  Needless to say the Zippo hand warmer get's 5 stars from me and I'll always have a few of these on my when hunting and ice fishing.  

Quick tips:
  • Allow the heater time to warm up (to the point that it’s almost too hot to touch) before putting it inside the fleece pouch.

  • In extreme cold you may want to put the warmer directly in your pocket without the fleece pouch in order to get a more heat.  Note: do this only if you’re wearing thick clothing that’ll keep you from having direct or close to direct skin contact.
  • Keep in mind the fleece pouch extends burn time but reduces heat conduction
  • For a warmer burn leave the drawstring open so the burner can get more oxygen.
  • If it's getting too hot close the drawstring to reduce heat.
  • DO NOT place the metal warmer directly against bare skin as this will cause burns.  This is especially important for numb fingers that may not alert you to being burned due to numb pain receptors. 

Pros:  Has very low odor, last very long and gets far warmer than the disposable hand warmers that we all use. 

Cons:  The only con is the fact that you have to refill the warmer with fuel thus you must keep extra fuel around.  (But I can’t really say that’s a con)


Price: $19.95

Friday, November 22, 2013

How to Make Venison Stock


Venison stock
Stock is a key ingredient in many of the different dishes you'll make.  And venison stock is no different from any other type of stock in that way.  Venison stock gives you a tasty base for wild game soups, stews, gravies and many other dishes.  It's simple to make and can be tailored to your specific taste buds by simply changing out the ingredients or even smoking the bones rather than roasting them before making the stock.  Below is a quick recipe for venison stock that'll have you putting more of this years deer harvest to tasteful use. 

Materials Needed: 
Cheesecloth
Stockpot
Roasting pan
Large measuring cup or large bowl

Ingredients: (these ingredients you can add to or take away from according to your taste)
Deer, antelope, elk, or moose bones
4 to 6 carrots, cut into 2-inch pieces
3 or 4 stalks of celery, cut into 2 inch pieces
2 medium onions or 4 small onions cut into quarters
1 or 2 garlic cloves
2 bay leaves
10 whole peppercorns (optional to taste)
4 or 5 sprigs of parsley
2 sprigs of thyme or 1tsp of dried thyme leaves


Directions:
1.  Arrange deer bones in a large roasting pan. Preheat oven to 450 and roast the bones util well browned.  This normally takes about 1 hour.  Be sure to turn the bones at the half hour point for even browning.
2.  Transfer bones to the your stock pot. (you may wanna use tongs to avoid burned fingers.) Loosen browned bis from the roasting pan by stirring and adding 1 cup of water if necessary.  Pour this liquid into a large bowl or measuring cup so you can skim the fat off of the top.  Add liquid to your stockpot with the bones. 
3.  Add the rest of your ingredients to the stockpot.  Cover the bones with cold water then heat over medium-high heat until the liquid comes to a boil.  Once the liquid comes to a boil reduce the heat and skim any foam from the top of the stock.  Let simmer for about 8 hours, skimming foam periodically and adding additional water when necessary to keep bones covered.
4.  Strain sock through 3 or 4 layers of cheesecloth into a large heat resistant bowl or pot.  Discard the bones, vegetables and any solid matter leftover in cheesecloth.  Pour stock back into the stockpot bringing the stock back to a boil.  Cook the stock until reduces to about 3 quarts.  Let it cool for a while before refrigerating over night. The next morning, skim any solidified fat from the top and your venison stock is ready.

Thanks for reading,
Kwan

LinkWithin

Related Posts Plugin for WordPress, Blogger...