Tuesday, December 24, 2013

Product Review and Tips For Using The Zippo A-Frame Hand Warmer


Description: The Zippo A-Frame hand warmer is a low odor hand warmer with a long warming life of 12 hours per fluid filling making it ideal for hunting, snowmobiling, skiing, ice fishing and football.  The product includes hand warmer, warmer bag and filling cup.  (Lighter fluid not included)

Review:  This is one of those products that I can't say enough about.  My first time hunting my mentor let me use one of these to help me keep warm on a day that was a very cold 11 degree day.  At first I thought I didn't need it because i had some of those disposable hand warmers.  However after an hour of sitting I quickly noticed the difference in heat being produced by disposable hand warmers and the Zippo A-Frame warmer.  Needless to say the Zippo hand warmer was far better at producing warmth and it lasted several hours longer than the disposable warmers. Not only that but it it had no odor that I noticed.  Needless to say the Zippo hand warmer get's 5 stars from me and I'll always have a few of these on my when hunting and ice fishing.  

Quick tips:
  • Allow the heater time to warm up (to the point that it’s almost too hot to touch) before putting it inside the fleece pouch.

  • In extreme cold you may want to put the warmer directly in your pocket without the fleece pouch in order to get a more heat.  Note: do this only if you’re wearing thick clothing that’ll keep you from having direct or close to direct skin contact.
  • Keep in mind the fleece pouch extends burn time but reduces heat conduction
  • For a warmer burn leave the drawstring open so the burner can get more oxygen.
  • If it's getting too hot close the drawstring to reduce heat.
  • DO NOT place the metal warmer directly against bare skin as this will cause burns.  This is especially important for numb fingers that may not alert you to being burned due to numb pain receptors. 

Pros:  Has very low odor, last very long and gets far warmer than the disposable hand warmers that we all use. 

Cons:  The only con is the fact that you have to refill the warmer with fuel thus you must keep extra fuel around.  (But I can’t really say that’s a con)


Price: $19.95

Friday, December 20, 2013

Product Review: Quantum Optix 30 Spinning Reel


Company Description:  Reel in your next great catch with the Quantum Optix Size 3o Spinning Reel Convertible.  The spinning reel features graphite frame construction and smooth, adjustable front drag.  The aluminum spool is strong and offers smooth casting, and the reel features selectable continuous anti-reverse for reliable line payout.  Two ball bearings and 1 roller bearing provide smooth line movement.  Collapsible single handle.  Internal bail trip.  195 yards/8 lb.


Features and Benefits:
  • Graphite frame Construction for light weight
  • 2 ball bearings and 1 roller bearing provide for smooth line movement
  • 5.3:1 gear ratio for high-speed retrieves
  • Reels 27 inches per revolution
  • Aluminum spool offers durability and smooth casting
  • Single collapsible handle
  • Selectable continuous anti-reverse for reliable line payout
  • Internal Bail Trip


Review:  I bought the Quantum Optix 30 early last year as a quick replacement for a cheap reel that came on a rod & reel combo set I purchased.  However when I got it home I realized that my ultralight reel was in poor condition so I slapped the Optix 30 on my ultralight.  Overall the reel is very nice it's pretty smooth for an inexpensive reel with only 3 ball bearings.  As well it's a pretty sturdy reel which has taken a beating from me over the past year. 

So far I've caught everything ranging from bluegill just large enough to be considered bait to a 12lb brown trout using the Optix 30.  The only problems I had with the reel is that the screws that hold in the reel handle and the wire bail work loose with normal usage.  This got to be extremely annoying, especially when chasing white bass, so I'll be figuring out some way to fix these issues before the ice thaws this coming spring.  Even with those two issues the reel will stay in my arsenal this coming spring.  However It'll be getting pushed over to a bit heavier rod. 

Overall the reel gets 4 stars from me. 

How I Used:  I have the Quantum Optix 30 paired up with a Berkley Cherrywood ultralight rod.  The reel is spooled with 6lb flourocarbon P-line. 


Pros:  The Optix 30 is very economical in price.  The reel has a reasonably smooth drag and is pretty light weight.


Cons:  The screw that holds in the bail wire consistently comes loose.  As well the screw that holds in the reel handle in place comes loose with normal use which can be annoying. 


Price: $19.99


Sunday, December 1, 2013

Elk Playing With Photographer

I saw this video and had to share it with you all.  Check this out.


Saturday, November 30, 2013

A Few Quick Pics of This Year's Late Salmon Trip

This past august I was lucky enough to be able to take a little time out to go to the west side of the state for a short salmon fishing and camping trip.  It is something my dad, my hunting partner and myself had been planning on doing since earlier this summer.  However every time we’d come up with a date it would end up being inconvenient for one party or another.   But eventually we got it together and made our way up north to the Pere Marquette River to chase spawning salmon.  


To say the least, we had a blast.  Below are a few pics from our trip.  We ended up catching quite  few fish over the course of two days, mostly snagging them.  However we did manage to catch 10 legal fish.  For bait I was using different fly patterns, mostly wooly bugger variations, but the most effective thing was a wooly bugger inline spinner that I make.  Which had a few fish biting at it out of aggression since the salmon this late in the spawn don't feed.   I'll post the pattern for the wooly bugger spinner that I make in a later post. 

Next year I'll making this trip a lot sooner so I can catch salmon while they're still fresh in the river and more aggressive. But this trip was still a lot of fun. 

Thanks for reading!

Me holding a decent sized salmon caught on a spinner.

My hunting partner with another nice salmon. 

Friday, November 22, 2013

How to Make Venison Stock


Venison stock
Stock is a key ingredient in many of the different dishes you'll make.  And venison stock is no different from any other type of stock in that way.  Venison stock gives you a tasty base for wild game soups, stews, gravies and many other dishes.  It's simple to make and can be tailored to your specific taste buds by simply changing out the ingredients or even smoking the bones rather than roasting them before making the stock.  Below is a quick recipe for venison stock that'll have you putting more of this years deer harvest to tasteful use. 

Materials Needed: 
Cheesecloth
Stockpot
Roasting pan
Large measuring cup or large bowl

Ingredients: (these ingredients you can add to or take away from according to your taste)
Deer, antelope, elk, or moose bones
4 to 6 carrots, cut into 2-inch pieces
3 or 4 stalks of celery, cut into 2 inch pieces
2 medium onions or 4 small onions cut into quarters
1 or 2 garlic cloves
2 bay leaves
10 whole peppercorns (optional to taste)
4 or 5 sprigs of parsley
2 sprigs of thyme or 1tsp of dried thyme leaves


Directions:
1.  Arrange deer bones in a large roasting pan. Preheat oven to 450 and roast the bones util well browned.  This normally takes about 1 hour.  Be sure to turn the bones at the half hour point for even browning.
2.  Transfer bones to the your stock pot. (you may wanna use tongs to avoid burned fingers.) Loosen browned bis from the roasting pan by stirring and adding 1 cup of water if necessary.  Pour this liquid into a large bowl or measuring cup so you can skim the fat off of the top.  Add liquid to your stockpot with the bones. 
3.  Add the rest of your ingredients to the stockpot.  Cover the bones with cold water then heat over medium-high heat until the liquid comes to a boil.  Once the liquid comes to a boil reduce the heat and skim any foam from the top of the stock.  Let simmer for about 8 hours, skimming foam periodically and adding additional water when necessary to keep bones covered.
4.  Strain sock through 3 or 4 layers of cheesecloth into a large heat resistant bowl or pot.  Discard the bones, vegetables and any solid matter leftover in cheesecloth.  Pour stock back into the stockpot bringing the stock back to a boil.  Cook the stock until reduces to about 3 quarts.  Let it cool for a while before refrigerating over night. The next morning, skim any solidified fat from the top and your venison stock is ready.

Thanks for reading,
Kwan

Thursday, November 14, 2013

Understanding Spinnerbaits Pt. 2 "Spinnerbait Tips"

I have to admit when I first started using spinnerbaits I had no confidence in them whatsoever.  I'd tie one on, fish with it for a little while, and catch nothing.  Subsequently I'd quickly toss the spinnerbait back into my tackle box opting for something I knew I'd catch fish with.  However, because I'm cheap and hated wasting money on baits I couldn't use, I decided I would start researching spinnerbait fishing in order to figure out what I was doing wrong.  

Well what I found is that spinnerbaits do work but work exceptionally well under certain circumstances and if used correctly.  You see, I just thought i could just cast anywhere and I'd be successful also I was under the false belief that the spinnerbait was not for use in heavy cover.  Well, I couldn't be more wrong.

The first thing I learned when I started my research was that spinnerbaits are the all around bait.  They are not limited to certain water, weather or structural conditions.  In fact they function at their very best in heavy cover and along weeds.


This is because spinnerbaits are best used as contact baits in other words they reap the best results when they are bumping up against structure.  That structure can be weeds, trees, stumps or the lake bottom. It's when these baits are bouncing of structure that most predator fish will grab spinnerbaits as the contact alerts bass that there is something wrong with this meal size critter making it an easy target.

As well from what I've noticed I catch more fish on spinnerbaits when it is overcast outside or in murky water.   In clear water you want to tone down the flash possibly going to singles blade spinnerbaits with copper blades to catch more fish.

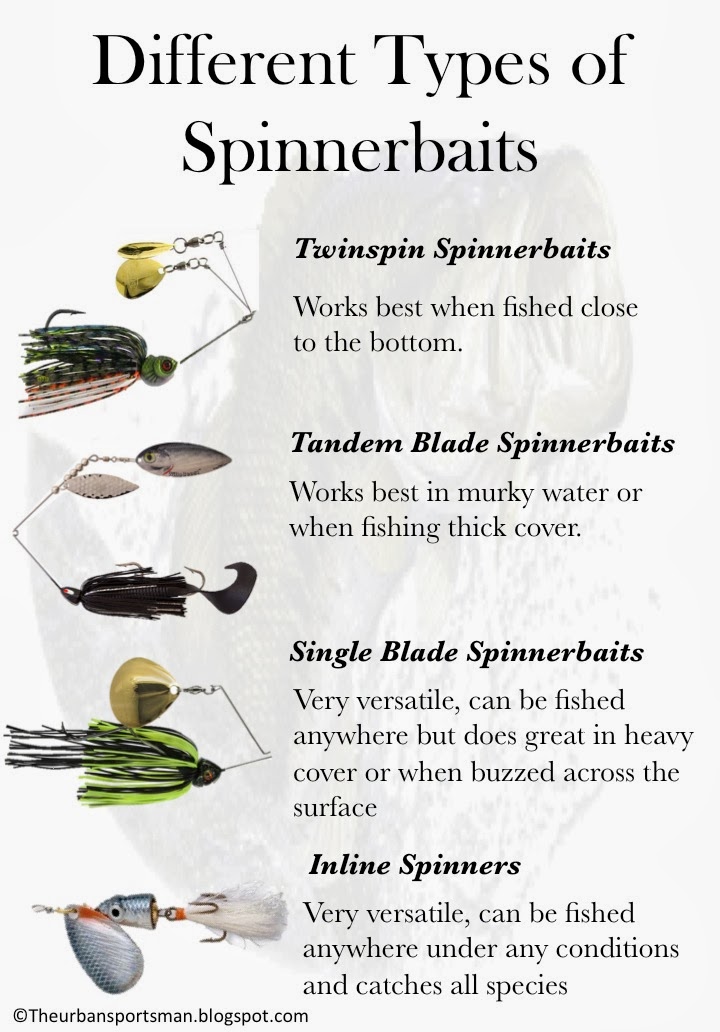
Another thing I learned was that spinnerbaits fell into two categories and particularly the elbow or safety pin style spinnerbaits had some different characteristics that would make me use them differently.
1. Twinspins: Are great when fishing along the bottom making contact with any structure along the lake bed. 
2. Long arm spinnerbaits: Can be fished anywhere the short armed spinnerbaits can but are especially suited for grassy or brushy cover as the longer arm works to keep the spinnerbait weedless. 
3. Short arm spinnerbaits: Can be fished anywhere but is especially suited for being helicoptered along ledges and vertical cover.
4. Singles blade: Great for clear water, cool water or any other time when fish aren't actively feeding. Due to their lesser amount of flash they are less likely to spook inactive fish in clear or cool water. Single blades with colorado blades can be retrieved slower with due to increased water resistance. 
5. Tandem Blades: Work great in murky water or conditions where visibility is low.  

Different Spinnerbait Retrieves
Slow Roll:
This retrieve is good when bass are resting deep along drop offs or submerged cover.  Simply cast into shallow water that leads to the drop off where the fish are holding.  With your rod tip pointed downward reel slowly allowing your spinnerbait to bump the bottom or the tops of any weedy or brushy cover following the lakes drop off to the bass.  

Helicopter:
Helicoptering your bait is almost self explanatory.  Pretty much you real to the edge of some sort of vertical cover, like a wall or stump, and let the spinnerbait fall along the edge causing it to flutter like a helicopter into the strike zone of any fish waiting at the base of the vertical cover. 

Waking or bulging:
Bulge a spinnerbait by retrieving so the blades spin just below the surface causing a bulge or wake in
the surface.  This is one by casting past your intended target cover, lifting your rod tip and reeling just slow enough to make the blades spin just beneath the surface never breaking the surface tension.  This technique will produce a unique sound and vibration that will attract bass in shallow murky water.

Buzzing: Buzzing is pretty much the same as waking or bulging.  The only difference is that you need to speed up your retrieve so the blades break the waters surfaces causing the spinnerbait to buzz along the surface.

Note: 
Rigging:  Use medium to medium heavy rods at lengths of 6.5 to 7.0 ft in order to get long cast on your spinnerbaits while giving you the backbone needed to set the hook at longer distances.  As well use high gear ratio reals in spooled with 12lb to 20lb test monofilament when spinnerbait fishing.

Trailer Hooks:  If you're gonna use trailer hooks make sure you use shorter shank hooks in order to increase hookups while staying as snag free as possible.  As well if the structure permits rig the trailer hook upside down in order to increase hookups as well. 

Overall I've learned quite a bit about fishing with spinnerbaits this last summer but I still have a long way to go.  I've been lucky enough to catch quite a few 3lb smallmouth and largemouth bass on spinnerbaits after I developed some confidence in them.  If you haven't used spinnerbaits yet make sure you try them as soon as you can as they are truly big fish baits. 

Thanks For Reading,
Kwan


LinkWithin

Related Posts Plugin for WordPress, Blogger...