Showing posts with label tips. Show all posts
Monday, November 26, 2018
Kayak Fishing Tips: Tips For Trolling With Deep Crankbaits
In the last two years I've been trying to perfect walleye fishing from a kayak. A bit of a tough task since I haven't perfected walleye fishing from a boat or shore. However, since kayak fishing has become my primary way of fishing it's time I figure out the best ways to target walleye.
Initially I started kayak fishing for walleye by trolling with crawler harnesses and Lindy rigs. In the spring and early summer I had pretty good success catching walleye this way. However, once the summer came on in full I noticed that my catch rates slowed.
What were the walleye doing different that was causing me to miss out on fish? The walleye had changed their forage to one comprised mainly of baitfish. With that in mind I started paying closer attention to my fish finder. The fish finder showed me that the larger fish were suspended at intermediate depths between 8 and 20 feet of water. No wonder I wasn't catching any walleye. The fish were suspended above where my bait was. Not only that but they were also suspended just below schools of bait fish.
This walleye behavior made me change my tactics. I went from fishing crawlers harnesses in deep water to trolling crankbaits that matched the size of the bait fish. Having located the walleye I decided to long line troll with deep diving crankbaits behind the kayak. Below are some tips that helped me put my walleye in the kayak while trolling.
1. Use a crankbait that dives the depth you need
The first thing you want to do is pick a crankbait that dives specifically to the depth you desire. For me this crankbait was the Berkley Flicker Shad. Since I was trying to catch fish that were hanging in water between 8 and 20 feet deep the flicker shads diving depth of 8 to 14 feet of water is one of the main reasons I picked it. However there was another reason I picked the flicker shad as my crankbait of choice.
2. Match the hatch
The other reason I picked the Flicker Shad is because it matched the size of the baitfish the walleye were feeding on. At that time of year the bait fish I was marking were all in the one to two inch size range so matching that size was key to catching the walleye that were feeding on them from below.
3. Use the right line weight to maximize diving depth
When I initially switched to trolling flicker shad I trolled with two rods running parallel to each other. With this set up I noticed I was only catching walleye on one of my rods. While on the other I was catching white bass which were slightly above and mixed in with the walleye. That told me that my crankbait on the other rod was not getting deep enough to attract the attention of the walleye.
My problem was pretty simple and required a simple fix. The two rods I was trolling with had two different line weights, 10lb and 14lb. The rod with the 10lb test was running the crankbaits deeper than the rod with 14lb test line. So a quick line replacement before my time out fishing was all it took to fix the problem of the shallow running rod.
4. How much line you have out affects diving depth
Every company that makes crankbaits will have a corresponding dive chart on their website. This tool is something you cannot afford to overlook if you're gonna long line troll cranks from a kayak. So make sure you are checking the chart to know how far your crankbait needs to be behind you to achieve the depth you desire. It's a simple thing that will keep you putting fish in the yak when you'd otherwise be just getting exercise paddling over the fish.
5. Don't troll two floating crankbaits at the same time
Probably the most frustrating thing that happens when long line trolling crankbaits is you often get lines tangled when you stop to reel in a fish. For me there was absolutely nothing more frustrating then reeling in a fish only to have it spin my yak into my second line causing me to get the lines tangle up. As a result I have stopped trolling two deep cranks at once. Now I always run a deep crank on one rod with a live bait rig such as a bottom bouncer and harness or a three way rig with leech or minnow dropped directly below me in order to avoid line tangles due to excess line out.
6. Use lead tape to cause crankbaits to ascend slower or suspend
The last thing I found when trolling with deep cranks is that I stopped paddling the crankbaits floated to the surface eliminating the possibility of additional bites. To keep you crankbaits in the strike zone longer after you stop add a little lead tape to the bottom my cranks. The lead tape will get my cranks closer to neutral buoyancy so they won't float up so fast or just suspend when you stop paddling. At least on two occasions this helped me land a fish that probably wouldn't have been willing to bite otherwise.
Hopefully these simple kayak trolling tips will help you put more fish in the boat. While they may seem simple they are pivotal pieces of the puzzle that is fishing. Tight lines and make sure you take a kid fishing the next time you go.
Labels:
bass,
bass fishing,
crankbaits,
fishing,
hobie,
kayak,
kayak fishing,
rapala,
tips,
trolling,
walleye,
walleye fishing
Thursday, February 8, 2018
Bait Profile: Clouser Minnow
The clouser minnow is one of the most famous flies in the world. Famous, not for its flash but because it simply catches fish. In fact Lefty Kreh has caught 86 species of fish on the clouser minnow and I'm making it a personal mission to catch and pass his species count.
The clouser minnow was created by Bob Clouser for Susquehanna River smallmouth bass. I believe that from the first time he used it the clouser minnow has been a hit with bass and fly fishermen alike. From personal experience I can to say it is the most productive smallmouth bass pattern I've ever used. In fact I've caught quite a few species on clouser including: bluegill, crappie, carp, largemouth and smallmouth bass, white bass and striped bass.
What makes the clouser minnow so effective? The steamlined body and jigging action of the clouser minnow is what makes predator fish fall for the bait. The bucktail of the body is just stiff enough to give the bait subtle lifelike action just like a minnow or shiner. And the dumb bell eyes cause the fly to have the jigging or darting action that mimics fleeing bait fish so well. It's a combination of these to features that make any wary predator fish take a bite.
Clouser Fishing Quick Tips:
- Make sure you're using a heavy enough rod to handle casting clousers. Since they are heavier flies due to the dumb bell eyes, using a lighter weight rod will not be able to load properly to cast the fly.
- Keep your rod tip low when retrieving clouser minnows.
- Clouser require an active strip, so accelerate and pause the stripping of fly line to give the clouser that fleeing action. What makes clousers so effective is that they never stop moving.
- When fishing with clousers at night use darker colors like purple and black.
- When tying clousers for striped bass fishing tie your clousers with sparse bucktail.
- Fishing in shallow rocky streams or creeks use clousers in a brown and orange pattern to imitate crayfish.
Match The Hatch: Clousers are by far the most simple fly that matches a large variety of forage species. Why? Because they match all small bait fish with no problems. All you have to do is match up your bucktail colors to the forage species you're imitating.
What are the materials used to tie the Clouser Minnow:
Hooks: I personally use the Eagle Claw Lazer Sharp Billy Pate Saltwater Fly Hook L067S in sizes #6 to 2/0. However pretty much any streamer hook will work for clousers I just prefer the saltwater hooks as they are what I've always tied them on. But any similar hook will work.
Thread: Danville Flat Wax 6/0 or 140 denier
Body Fur: Bucktail, craft fur, flashabou & squirrel tail for extra small clousers
Eyes: Bead chain eyes or Dumbbell eyes
Under Body: Flashabou
Thanks for reading and tight lines everyone!
Thursday, June 29, 2017
Tips For Staying Safe While Kayak Fishing At Night
Let's face it, some of the best fishing you'll ever encounter is at night. This is especially true during the dog days of summer when even the fish are not too happy about the extreme heat of the day. Whether you're catching catfish by starlight or crappie by streetlight, night time fishing is always a blast and almost always productive.
No matter how productive it is, when fishing at night from a kayak, safety is your biggest concern. As we all know, when fishing at night your sight is extremely impaired. With that in mind you have to remember that also means the vision of pleasure boaters and bass fisherman, whom you share the lake with, is also impaired. Not only is their vision impaired but we as kayak fisherman and women are sitting far lower on the water than they are so we're even less visible to other people on the water. For that reason your number one safety tip for kayak fishing at night is to light it up.
1. Light It Up!
Depending on where you live the laws may require you to have a light on your kayak that is visible up to 300 feet with a 360 degree field of view. Whether the law requires it or not, you need to have a light that is positioned higher than you are on the kayak so you extend your visibility. Your first priority with kayak fishing at night is making it home at the end of a successful night of fishing. Having a light that is visible from a long way off is the first step of letting anyone you're sharing the lake with know you're out there. A kayak light I recommend is the YakAttack VISICarbon Pro. You can get it with pretty much any mounting option you want, from geartrac guides to ram balls. However if you're not interested in paying for a yak light and you're pretty good at tinkering you can make one yourself for less than half the cost.
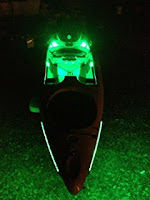
Now that you're kayak can be seen by anyone on the lake you're fishing on, it's time to consider you're field of view. Fishing is a sport that requires a large amount of tedious tying of knots, accurate cast, changing baits and dodging sharp fins that are eager to test their sharpness in one of your hands. All of these things require you to be able to see what you're doing so lets talk options for opening up your field of view so you can actually fish in comfort.
The first option you have is the use of handheld flashlights. While they're not a perfect option they're an option. Hand held flashlights will give you light to work however the problem with them is that they require you to use one of your hands which limits how efficient you are when tying knots etc. I personally keep a small flashlight in my dry hatch with my phone in case of my primary source of light goes out or gets wet and shorts out. But beyond that I don't expect to get much use out of a handheld flashlight.
The next option is the use of a headlamp. Headlamps are compact and hands free which makes them a great light source when its time to unhook a flapping fish. As well with most head lamps you can broaden or tighten the beam as needed. Not only that but you usually have an option for using a different color light. This function is great because the one big drawback to using a head lamp is the fact that lights attract bugs. The change of color will lessen the amount of flying insects hovering around your head.
Probably the best option is to make an overhead light for your kayak. It'll keep the bugs out of our face while giving you the light you need to perform any task you may have. As well they are great for those of us who film our outings. As we all know gopro cameras don't do well in low light but an overhead light will give your gopro the light it needs to make filming successful. Click here for a great example of a diy overhead light created by: Kayak Catfish
The other great function of an overhead light is, depending on how you build it, it can function as a spot light as well. So when you're paddling in at the end of a good night of fishing it can give you the light needed to guide the way.
2. Reflect
Where lights do a great job of making you visible and giving you a larger field of view at night, placing reflective tape on your kayak and PFD will help people see you by reflecting their lights back at them. Reflective tape is a great back up plan in the instance your lights fail due to battery failure or any other malfunction.
Beyond reflective tape I've also added glow in the dark spray paint to my rod holders that are attached to my crate. Is it overkill? Possibly, but it's one more thing that keeps me visible and safe on the water.
3. PFD
Just because this is number three on the list doesn't mean it's not as important than the first two items on the list. Wearing your PFD is the absolute most important thing you can do at night. Let's face it there are just two many variables at night that can have you going for an unwanted swim, so wear your PFD. If you fish rivers that have dams upstream of where you fish you should have on a PFD because the water flow can increase very quickly and that increase can wash large debris down with it that can knock you in the water. I could go on forever with different scenarios on why you should where a PFD at night but I won't, I'll just leave you with this.

When my dad was teaching me to drive he said to me, "When you're driving you have to constantly be accounting for the actions of others. Assume that everyone else on the road is stupid and compensate for that stupidity in order to keep yourself safe on the road." While his analogy was a bit cynical his lesson was very true and even more true when it comes to kayak fishing at night. We've all seen how pleasure boaters and bass fishermen in boats can do some pretty careless things. Things that could easily hurt one of us had we not been paying attention. So magnify those careless things by 10 when you're out there fishing at night, because not only are they possibly being careless but they also can't see while they're doing it. Wear your PFD.
4. Know Your Surroundings
When your eyes are limited as a source of information you have to compensate for that in some way, familiarity is that way of compensation. Take some time to fish that spot during the day and familiarize yourself with every aspect of that spot. That familiarity will allow you to dodge objects that your eyes can't see. It's one thing knowing there is a sunken log in the lake it's an altogether different thing knowing exactly where that log is. It's the difference between having fun fishing and taking a miserably cold swim at night.
The other aspect of knowing your surrounding is constantly looking around. Just because you know the lay of the lake doesnt make up for those unpredictable things that can happen. Things like floating debris, other boaters, or getting to close to a swans nest are things that can ruin your night if you're not constantly looking around. So keep your head on a swivel and be vigilant in your awareness while out on th water.
5. Take a buddy
The only thing better than your eyes watching your back, is having a second pair of vigilant eyes helping you stay safe. Your fishing buddy is your second most important asset while kayak fishing. Your buddy is there to see things you may not. As well two of you are an irreplaceable first aid tool for each other, a helping hand if you go overboard and the best way to keep fishing fun throughout the night. So choose your fishing buddy wisely.
6. Make Yourself Heard

7. Leave a note with your location (lattitude and longetude)
Kayak fishing is a pretty safe sport however things can go wrong in a hurry. One thing that can help you in case of an emergency is leaving a note telling someone where you'll be fishing. It doesn't matter where I'm kayak fishing nor how familiar I am with the spot, I always leave a note telling someone where I am. This is doubly true when I'm fishing on the great lakes or any large bodies of water for that matter.
My notes always have an image of the area I'm fishing with my put in and out point clearly marked. As well the spots I intend to fish are marked on the map to make life easier for any would be rescuers. Beyond the image in my note I leave the longitude and latitude of where I'll be as well as any address that available for where I'll be putting in. The only other major info in my note is what time I'll be on my way home and should be home, that way if for some reason I'm too late my family knows to look for me. This step isn't just for you but it's for your loved ones who have a huge stake in you making it home.

8. Be GPS & Radio Ready
When fishing large bodies of water like the ocean or Lake Erie, as I try to do as often as possible, its not hard to get out of cell phone range so you need to be prepared. A simple way to be prepared is to have a VHF radio with you whenever going long distances off shore. The VHF radio will work out of range of a cell phone as well it will reach other boats in the area when calling out. Unlike a cell phone the VHF radio will reach out to anyone listening where a cell phone is specific to whomever you call. This will give you much higher chance of rescue in case of an emergency.
The other thing you'll need to have is a GPS. The GPS will point you in the right direction if the shore is no longer in your line of sight. Additionally it will give your exact location in case you have to hail for help over the VHF radio.
9. Be Organized
Kayak fishing at its core is a minimalist sport. Pretty much you're limiting yourself to what you can carry in a milk crate and the pockets on your PFD. So the best thing you can do is when it comes to kayak fishing at night or during the day is be organized. Good gear organization will save you frustration and possible injury while fishing in the dark. There is absolutely nothing worse than having to fish around for your fishing pliers while turned around uncomfortably and trying to hold down an angry 15lb catfish. That's a recipe for disaster, so save your self from wayward fins, and sharp hooks by being extremely organized.
10. Blaze your take in and out trail
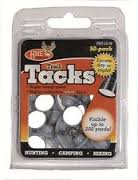
The best answer to that question is to use hunting trail tacks to blaze my trail in and out of the water. A simple scan with my flashlight or spotlight and the tacks reflect back to me where I need to go to get back to my car safely. So use reflective tacks or tape to blaze yourself a trail for nontraditional launch points.
Overall when fishing at night safety is your biggest concern. Hopefully these ten tips will help you stay more safe the next time you're out at night chasing big fish. Please comment below with any other night fishing tips you can offer to our fellow anglers.
Labels:
bass fishing,
catfish,
DIY,
film,
fishing,
hobie,
kayak,
light,
night,
tips,
wilderness systems,
yakfishing
Monday, March 6, 2017
Tips for Smallmouth Bass Fishing With Bucktail Jigs
This is not my photo and unfortunately I'm not sure who to give photo credit to
If I've said it once I've said it a thousand times. Bucktail jigs are smallmouth bass candy. It doesnt really matter where you are in the country, as long as you have smallmouth bass in your area then you probably do or at least you should have some bucktails in your tackle box.
I've personally been using bucktails for smallies for several years. However as of late I've been trying to perfect this method of fishing. In fact my journey to becoming a better bucktail jig fisherman started with me searching the web and that only yielding limited results. That's what brings me to this post, giving a detailed how to article for fishing bucktails for smallmouth bass.
As with any other type of fishing you're pretty much going to start with matching the hatch when it comes to bucktails. That can't be more true when it comes to smallmouth bass. No matter where they live, be it in creeks, deep rivers or northern shield lakes, smallmouth bass eat the same things. The number one meal on a smallmouths menu is gonna be crayfish followed by bait fish then hellgrammites. If you can mimmic any of those three you're gonna catch smallies with bucktail jigs.
Jig Size: So what size jigs should you be using for smallmouth? That depends on the waters on you're fishing. For example for catching smallmouth in shallow water, creeks and streams you'll want to use 1/8 oz. to 1/4 oz. jigs. In fact most applications are gonna be fished with 1/8 to 1/4 oz. jig. However in deep, swift current rivers like the detroit river, depending on where you're fishing you'll want to up your jig size to 3/8 oz. As a rule though, no matter where your fishing you want to use the lightest jig you can get away with so you can achieve the most natural action possible. I personally only tie 1/8 and 1/4 oz. jigs for smallmouths as when I'm chasing smallies even on big water I'm fishing relatively shallow.
Rod & Reel Setup: Throwing these small jigs doesnt require much in the line of equipment. Fishing bucktail jigs is pretty much a finesse technique like fishing the ned rig or shaky head so the same equipment used for either of these will work for bucktails.
Rod: You wanna use a 6.5 foot to 7 foot medium to medium/light spinning rod with moderate to morderate/fast action tip. The light rod will make casting the lighter jigs much easier. While the moderate action will help load the smaller jigs for longer cast. In addition to getting to longer cast the moderate to fast action will give you enough backbone to get the jig out of mud with no problems unlike slow action rods like Ugly Stiks which will flex with encountering structure and mud.
Reel: You'll want to use a 20 to 30 series spinning reel spooled with 6lb to 8lb test line for fishing bucktails. I personally spool my reels with 30lb braid attached to a 8lb flourocarbon leader as the two have the same diameter. This gives me a little more casting length and more confidence for fighting bigger bass.
Where to fish: In small rivers, creeks and and streams you want to focus on fishing the runs and pools. As well fish any eddies created by large rocks and log jams, simply cast above them and jig your way down past these spots where waiting smallmouth will be. Bridge pilings are also perfect smallmouth attracters so definitely target any bridge pilings you come across in the same way you would any other eddy.
Gravel flats and the base of dams are also amazing places to fish with bucktails. These rocky areas hold crayfish, small baitfish and hellgrammites which make them a buffet for hungry smallmouth. In fact if you see if a shallow flat that has a bunch of holes in it target that area especially as those holes are crayfish dens and the smallies will be cruising those looking for an easy meal.

Also in cold deep water for suspended bass another tactic you can use is the Float-N-Fly technique. Pretty much for this technique you're suspending your hair jig about 11 to 13 feet below a small bobber on 4lb to 6lb test. When fishing the Float-N-Fly rig you wanna use a 9ft. to 11ft. noodle rod in order to cast with such a long leader. For the Float-N-Fly rig you'll be fishing it along channel edges, deep points, bluggs and steep banks while twitching the bobber lightly to give the jig action. The great thing about the hair jig is that you dont need much to give it action as the bucktail has a very lifelike action on its own.
To Trailer or Not to Trailer: Normally when you're using jigs for bass its not
uncommon to attach a soft plastic to your jig as a trailer. However in most cases this is not necessary with bucktail jigs as the bucktail has a very lifelike action on its own. If you want to use a trailer though probably the best trailer you can use is a pork rind, yes an old school porkrind. If you're gonna fish with a fly-and-rind rig it'll work best if your porkrind has a contrasting color to the bucktail. The other trailer you'll want to use for bucktailing is a twister tail. Another option to a trailer is to tie a bunny buckail jig, in this case the zonker strip will function as your trailer.
When: Most people assume that bucktail jigs are only cold water baits. However bucktails are a year around pattern, especially for smallmouth bass. You just have to know the patterns of the smallmouth in your area in order to target them with bucktail jigs effectively. Howevever, the spring and fall will be the best times for fishing with bucktail jigs as smallies are feeding heavily in preparation for winter or the spawn.
Colors:
When it comes to colors, it's pretty simple. Consider where your fishing and what forage is in that area. For schooling baitfish go with lighter colors and for bottom dwelling forage go with darker patterns. Here is a list of some of the more productive color patterns for smallmouth bass.
White
White and blue
White and red
white and pink
White and chartreuse
Black
black and blue
black and gold
black and white
brown and white
brown and orange
brown and yellow
black and yellow
olive and black
olive and yellow
olive and orange
Rust
Rust and black
rust and yellow
rust and orange
Sunday, February 19, 2017
Match The Hatch: Bucktail Jigs
In my opinion the bucktail jig is the most underrated and under utilized bait in the fishing world. It's an unfortunate fact that many of us see see a bucktail jig and categorize it as a bait that is strictly for cold water situations or a bait that's strictly for striped bass and fluke.
Well, we couldn't be further from the truth when it comes to bucktail jigs. They are probably the most versatile ever to be utilized by all fisherman. The bucktail has been responsible for catching more fish in salt and freshwater than any other bait outside of live bait. This is due to the fact that in the water this simple bait does an amazing job of imitating any bait fish you can think of. And as we all know all predatory fish eat just about any fish smaller than them.
With more and more people using bucktail jigs on youtube they're making a huge come back in the fishing world, going from a few fishermen secret weapon to being a weapon of choice for many anglers.
In this blog post I wont go into tips and tactics for using bucktail jigs because I'll be doing 3 more post to cover the tips and tactics that'll catch you fish with a bucktail. However this post is just a match the hatch post which will list some of the bait fish that bucktail jigs mimic.
Matching the Hatch: Below is a list of the forage species that Bucktail Jigs imitate.
Shiners:
If you have freshwater then you have minnows and shiners. In most cases, with the exception of Golden and rainbow shiners, shiners a silver sided snack for predators. So pretty much any color patter will work as long as its a light color. So when tying up hair jigs to imitate shiners your main objective is to match the general size of he shiners you're seeing. As well as have your colors tied up based on water clarity moreso than anything.

My choice of colors for shiners are white, white and blue, white and chartreuse and white and pink. But no matter what color I'm using with any silver sided bait fish i'm tying in flashabou to cause the jig to reflect and refract light like the scales of a bait fish.
Keep in mind that shiners a schooling fish so find the schools and work your bucktail jig in the same area of he water column just below the school. Why just below? Because most predatory fish will work the schools of shiners from below. So if your jig is just at the bottom of the school then it's considered a straggler and an easy target for any predators lurking below.
Shad:
Shad, like shiners, are silver sided meals on wheels for most predator fish. Shad range in size from 1 inch all the way up to 20 inches depending on species and age. As a result you want to tie up bucktails ranging from 2 inches to 8 inches in length to match shad lengths. In order to tie the larger sizes you'll have to use jig heads that have a longer profile like ultra minnow heads and banana head jigs. As well you'll want to tie not just plain bucktail jigs to match larger shad but you'll want to tie preacher style bucktails and bunny bucktail jigs.

As far as colors go you're pretty much using the same color patterns as you would for shiners. As well the general schooling behaviors of shad are similar to shiners so you can fish your bucktails in the same way except for one notable exception. When the water temperatures drop to 45 degrees some of the shad population have a die off. So you want to mimic the die off once the water temps get below 45 degrees. You do this with sharp hops off of the bottom to mimic struggling and dying shad.
Sculpin, madtoms and gobies:


When I'm fishing waters that have any of these three species of bait fish I go with bucktails that are either brown, olive, black, olive with a black top and yellow with a brown top. As all, sculpin, madtoms and gobies are all bottom dwelling bait fish I keep the hair jigs bouncing close to the bttom or swimming just above the bottom. So no high hops as the these species will retreat to rock crevices when in danger so this is what you want to imitate.
On average each of sculpins, gobies and madtoms range in length from 2 to 5 inches as a result you want to match that size. It's not hard to match these sizes with just bucktail jigs. However for longer lengths and a change of action using bunny bucktails or preacher style bucktails will give you a better chance of matching.
Often times areas that have sculpins, gobies and madtoms will also have rockbass. In the case of imitating juvenile rock bass the same patterns will work. The only difference is you'll use a red eye instead of a dark colored eye.
Bunker:

Bunker also known as menhaden are striper and bluefish candy. Where ever you find a school of bunker there is a very high likelihood you'll find striped bass and bluefish nearby. This is especially true with peanut bunker, juvenile bunker, because of the large schools they roam in. It's not uncommon on the Long Island sound to come across a school of striper and bluefish blowing up on peanut bunker. For this reason when you're fishing for striper or bluefish you want to have bucktails somewhere in your tackle box.
On average bunker grow to between 12 and 15 inches in length. However when you're matching this forage species you're matching the juvenile bunkers size. So 3 to 6 inches is the size you wnna go with
Sand Eels:
Sand eels are another major forage source for striper, bluefish and fluke. Pretty much the same patterns you'd use for matching bunker will work for matching sand eels. However with sand eels you can add chartreuse, pink and black and purple to your bucktail stash as these colors work great when mimicking a sand eel hatch.
These small fish are bottom dwellers that like sandy and small smooth gravel sea beds so keep this in mind when fishing with your bucktails. So swim them along the bottom or jig it with small hops rather than high jigging motions to imitate these bait fish.
Squids
Cephalopods like squid are very common feed for large saltwater predators. The sky is the limit when it comes to the colors of bucktails you wanna use to imitate squid. This is due to the fact that most cephalopods like squid are capable of changing colors in order to camouflage themselves or given their moods.

In most cases squid will school just like bait fish which attracts the attention of predators. However this is with one major difference, their major habits and schooling takes place at night. So be looking out for a night time bite. As well due to the size of squid most squid patterned bucktails are heavy thus are used in vertical jigging techniques.
When tying squid patterned bucktails you wanna use a hair stacker so the buck tail can be uniform and add a couple strands of long grizzly hackle to imitate the two longer grasping tentacles of squid.
Octopus

Like squids, octopus are cephalopods that have the ability to change their color to adapt to their surroundings or show moods. So when matching octopus patterns if you'll want ot match to the given species you have in your area. However due to the ability to alter their pigments you can pretty much go with whatever colors that will give you the best suit your water quality.

One major thing you want to think about though when matching octopus is their behavior. Octopus don't school and hunt like squid do. They are bottom dwellers so keep that jig skimming the bottom when imitating an octopus. Don't get me wrong octopus are great swimmers but their normal behavior is to sit near the bottom where they are safest and can find an easy meal.
My hope is that you got a bit more understanding about fishing with bucktail jigs by understanding the forage that the jigs imitate. Stay tuned for multiple follow ups to this post, going into more depth about the different species you can target with bucktail jigs.
Thanks for reading and tight lines
Wednesday, July 8, 2015
Match The Hatch: It's Hopper Time
I woke up this morning with the intention of heading into the garden to pick some weeds and harvest a few veggies. But, once I got out back, I realized it was hopper time. You know that time of the year when grasshoppers seem to be everywhere? Hopper time is a gardeners worst nightmare and a fisherman's dream. For those who garden, it's the time when a plague of grasshoppers decide your plants are just as tasty as you hope they'll be. I have a love/hate relationship with this annual event. I hate seeing the damage they do to my vegetables,but I love that by using a simple butterfly net and a cricket cage, I'm ready for a few weeks of great pan fish fishing.
Before we talk tips, let's understand how the hatch actually works. Grasshoppers tend to hatch from the ground in late spring and early summer. So the season usually gets good around the beginning of July and last
through late September or longer depending on the temperatures. Born wingless nymphs, the hoppers feed on tender leaves and vegetation until they're ready to molt, which they'll do a few times as they grow to adult size. As an adult, they grow wings. This is when they are big enough to harvest for bait.
There are two ways to catch grasshoppers.The first is to simply sneak up, grab them, and throw them into a bottle or bucket. But, I use a butterfly net. I brush the butterfly net across the tops of the grass and high standing garden plants. The hoppers will jump into the net in an attempt to escape. I move them promptly into a cricket cage for transport to the lake.
I use grasshoppers as pan fish bait. But, they are a versatile bait. Hoppers attract everything. I've caught bullhead catfish while fishing hoppers on the bottom as well as bluegill, carp, trout, and large mouth bass while fishing hoppers on the surface. I think this is because grasshoppers aren't particularly graceful when they land in the water and fish won't turn down such an easy meal.
Tips for fishing with grasshoppers:
1. There are two simple ways of rigging grasshoppers. A. Hook the hopper just beneath the collar when fishing surface presentations. B. When using subsurface presentations thread the hopper from head to tail.
2. Use light wire aberdeen hooks size #4 or #6 for rigging grasshoppers as the thinner hooks are easier to rig the hoppers with and the thinner wire doesn't damage hoppers as bad as thick wire hooks, thus keeping them alive longer.
3. Use light monofilament line when hopper fishing. This is true for live hoppers or imitations like Rebel's Crickhopper. The monofilament floats which aids in keeping your hopper on the surface and 2 and 4lb test lines aid you in casting such light baits.
4. Cast your hoppers, imitation or real, close to shore where high weeds are abundant. This is key as fish are used to seeing random hoppers landing in the water near high weeds.
5. Whether you're using hard hopper imitations like crickhoppers or fly fishing with foam or deer hair flies, present the baits with soft twitches or pops.With lures like the crickhopper popper, you'll be tempted to chug away at it like you would a minnow shaped bass popper to get the fish's attention. But, if you've ever see a grasshopper fall in the water, it doesn't make huge splashes as it's trying to get out of the water so keep your popping short and literally popping.
Thanks for reading!
Thursday, January 29, 2015
Bluegill Foam Spider Fly Breakdown
The foam spider is probably one of the easiest flies I tie as well as one of the most commonly used flies as well. The foam spider is one of the first flies I learned how to tie and definitely the first one I caught something on. For that reason this is a great first fly to teach young people to tie. It can be tied in just about any size from as small as a #10 hook to as large as a #4 which when the bass are taking topwaters is very effective. Not only that but the materials don't have to be overly precise, I've personally used basic craft foam cut to shape with scissors and cut rubber bands for the legs and the bluegill could care less.
As well it's probably the best fly for young people to fish with because it's easy to cast as well bluegill will consistently chase this fly down and eat it. Casting the foam spider doesn't require any finesse or gentle touchdowns like casting dry flies for finicky trout. In fact a splat landing is just fine as it gets the attention of hungry panfish as well as bass looking for an easy meal.
Basically the foam spider imitates any terrestrial that has fallen into the water. However what I've noticed is that you can tie it in just about any color pattern but for some reason lighter bodies don't work as well and bee color patterns tend to work best right after a rain. All in all it's a great fly to have in your box especially if you plan on harassing the local bluegill population in your neck of the woods. As well this is a great starter fly for kids.
Tying Tips:
- Use the lightest thread you can get away with.
- Do not wrap an entire thread base as thread absorbs water and inhibits the fly's ability to float.
- Use as little pear chenille as you can, as the center thread of the chenille absorbs water inhibiting the fly's ability to float.
- If you find the fly is difficult to see in the water tie in a small foam bright colored indicator on the top.
Fishing tips:
- Let the fly splat down on to the water. This makes it seem like a bug that has fallen out of a tree.
- Give the initial ripples around the fly a chance to dissapate before moving the fly.
- Try short erratic retrieves and long retrieves to see what fish want.
- Use the lightest weight hook you can find. The less the weight the better it'll float.
Here is a great video tutorial of the foam spider that I tie all the time.
You may also Like:
Matching The Hatch: Wooly Bugger
Due to the simplicity and ease of use, the wooly bugger is probably the first fly every beginner learns to tie. Continue Reading Here!
Matching The Hatch: Elk Hair Caddis
For years fly fishermen and women have had one motto or truism when it comes to picking which fly to use next and that is "Match The Hatch". Continue Reading Here!
Fifteen Minutes to Jig Up Some Bluegill
Today I decided to sneak away during my 30 minute lunch to try out one of my hair jigs I'd tied this week. Continue Reading Here!
Subscribe to:
Posts (Atom)