Showing posts with label how to. Show all posts

Thursday, January 29, 2015

Bluegill Foam Spider Fly Breakdown


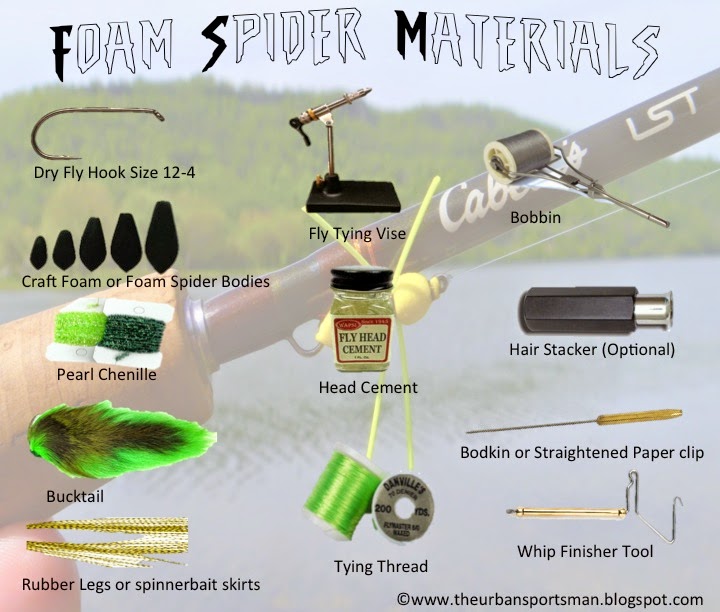
The foam spider is probably one of the easiest flies I tie as well as one of the most commonly used flies as well.  The foam spider is one of the first flies I learned how to tie and definitely the first one I caught something on.  For that reason this is a great first fly to teach young people to tie.  It can be tied in just about any size from as small as a #10 hook to as large as a #4 which when the bass are taking topwaters is very effective.  Not only that but the materials don't have to be overly precise, I've personally used basic craft foam cut to shape with scissors and cut rubber bands for the legs and the bluegill could care less.

As well it's probably the best fly for young people to fish with because it's easy to cast as well bluegill will consistently chase this fly down and eat it.  Casting the foam spider doesn't require any finesse or gentle touchdowns like casting dry flies for finicky trout.  In fact a splat landing is just fine as it gets the attention of hungry panfish as well as bass looking for an easy meal.

Basically the foam spider imitates any terrestrial that has fallen into the water.   However what I've noticed is that you can tie it in just about any color pattern but for some reason lighter bodies don't work as well and bee color patterns tend to work best right after a rain.   All in all it's a great fly to have in your box especially if you plan on harassing the local bluegill population in your neck of the woods. As well this is a great starter fly for kids.

Tying Tips:

  • Use the lightest thread you can get away with.  
  • Do not wrap an entire thread base as thread absorbs water and inhibits the fly's ability to float. 
  • Use as little pear chenille as you can, as the center thread of the chenille absorbs water inhibiting the fly's ability to float. 
  • If you find the fly is difficult to see in the water tie in a small foam bright colored indicator on the top. 


Fishing tips:

  • Let the fly splat down on to the water. This makes it seem like a bug that has fallen out of a tree. 
  • Give the initial ripples around the fly a chance to dissapate before moving the fly. 
  • Try short erratic retrieves and long retrieves to see what fish want. 
  • Use the lightest weight hook you can find. The less the weight the better it'll float.


Here is a great video tutorial of the foam spider that I tie all the time.


You may also Like:


Matching The Hatch: Wooly Bugger
Due to the simplicity and ease of use, the wooly bugger is probably the first fly every beginner learns to tie.  Continue Reading Here!


Matching The Hatch: Elk Hair Caddis
For years fly fishermen and women have had one motto or truism when it comes to picking which fly to use next and that is "Match The Hatch".  Continue Reading Here!


Fifteen Minutes to Jig Up Some Bluegill
Today I decided to sneak away during my 30 minute lunch to try out one of my hair jigs I'd tied this week.  Continue Reading Here!

Saturday, May 24, 2014

How to Maintain Your Baitcaster Reel "Video"


Yet again I've come across a great video on youtube that gives a tutorial on disassembling and maintaining baitcasting fishing reels.  The two videos were made by TackleJunky81. 


Tuesday, February 11, 2014

Matching the Hatch: Elk Hair Caddis


For years fly fishermen and women have had one motto or truism when it comes to picking which fly to use next and that is "Match The Hatch".  In other words match your fly to what the trout are eating.  I've been thinking of this fact and wondering what I can do to make this statement come to life.  So I decided to make a Match the Hatch series of blog posts, possibly once a month, highlighting different baits, not just flies, and matching them to the bait species they imitate.  This way we can learn both how to fish said baits matching them to their real counter parts.

So with that in mind here is the first "Match the Hatch" post.  I first heard about caddis flies in particular the winter caddis when I lived in Connecticut and decided to learn how to fly fish.  The first question I asked that winter after learning how to casts a fly rod was which baits should I learn to tie first.  Well, the person working at Orvis, also a fly fishing guide, said I should start with the elk hair caddis fly but make sure I tied it in the winter caddis colors as that is what they were currently catching trout on the Farmington River with.  Which to me made no sense whatsoever because it was very much into the winter and from what I understood no bugs would be hatching or flying about in the winter.  Well I was wrong, caddis flies do hatch in colder months.  So a quick grab of the materials and I was off tying some not very artistic looking elk hairs with the hopes of catching a fish or two that winter. 

Needless to say I didn't get lucky enough to catch a trout on those flies that winter.  However what I did learn was that just about every fish in streams, ponds and lakes will gorge themselves on caddis flies during an evening hatch.  As that following spring I got lucky and experienced a hatch while casting wooly buggers for trout in a local lake.  So with a quick switch of baits I was landing way too many bluegill a couple of small bass and yes my first trout on an elk hair caddis, only on the tan color not the winter caddis pattern.  From that point forward I've always kept them in my fly box whenever I'm out fishing, which this year turned out to be another forgotten treasure as I learned pretty quickly that here in Michigan when the flying ants begin to hatch the elk hair makes a great imitation for them as well.
The materials needed to tie the elk hair caddis are:
  • Sizes #12 - #18  dry fly hooks  (Mustad R50-94840)
  • Elk Hair
  • Saddle Hackle in brown, grizzly or black
  • 6/0 Tying Thread
  • Super fine copper wire for ribbing
  • Dubbing your choice of color

The overall pattern is very easy to tie so it's perfect for someone learning, as we all are.  Below are  few videos with great examples and variations on this essential fly.


Tuesday, February 4, 2014

How to Use Straws For Waterproof Camping Storage


If you've spent any time in the outdoors where you were required to pack in to a given location then you know that limiting weight, saving space and water proofing are a must. So how do you get everything you "need" into your campsite whether you're hiking or canoeing in.  This is especially true when it comes to luxuries like cooking spices and necessities like fire starting agents such as matches.
Well, one of the simple tools I use to get small items into camp safe compact and dry are basic straws.  I personally store my cooking spices, matches, Vaseline soaked cotton balls and neosporin inside sealed straws when backpacking, kayaking or canoeing into my campsites.  Note: Make sure you label your straws with a needle nose sharpie so you don't mix up things like toothpaste and neosporin.  I don't think you'll like the taste...  Overall this is a very simple tool to make so below I'll show the simple steps of how to make straws into simple storage devises.

1. Assemble the tools needed to make your storage straws. A simple lighter, needle nose pliers (or small pliers of any kind) and a pair of scissors will be needed. 
2.  Cut the straws to whatever length you'd like.  I personally cut them pretty short in order to store spices in single serve sizes for camp meals. 

3. Pinch one end of the cut straw with your small pliers and burn the exposed tag end briefly in order to get the end to seal. (You may have to pinch the tag end with your fingers to seal it completely)

4. After having one side sealed place whatever you want to keep dry inside of your mini-container. Ie. toothpaste, spices, matches or anything else you can think of that you want to keep dry.

5. Repeat step 3 sealing the opposite end of the straw thus protecting its contents from the elements.

Here is a video of the actual process just to make learning this a bit easier:

Tuesday, October 1, 2013

Understanding Topwater Baits


Ask any angler what their favorite way to fish is and odds are your answer will be topwater fishing. Why? Because there is nothing like seeing a fish explode out of seemingly no where to engulf your bait.   The adrenaline rush it gives anglers is unparalleled and will have you eager to throw your bait back in the water after landing that fish.                

Not only that but depending on what bait you're using topwater baits give you a great way to fish areas blanketed with fish harboring weeds and lilly pads.  So just to simplify things a bit for you here is a list of the different types of topwater baits available.

Hollow Frogs & Rats:  Hollow bodied frogs and rats are probably the ultimate lilly pad fishing bait. This is due to the fact that they are weedless and easily crawl across weed mats and pads producing a big silhouette for fish to see from the underside of pads.  Don't be afraid to tie a frog or rat on and give it a whirl, fish love them and trust me you will too.


Poppers:  Poppers also known as chuggers and spitters have concave faces that cause them to pop, gurgle or spit water when you twitch them.  Unlike frogs and rats poppers are not weedless and need to be fished in relatively open water or in water where the tops of weeds haven't reached the top of the water yet (I've had great success in this case).  Poppers are retrieved with a series of rapid twitches but don't be afraid to vary it up.


Stick Baits (Walkers):  I believe the Zara Spook might be the most widely used stick bait there is on the  market.  It's cigar shape and weighted rear end allows it to have a walk the dog (side to side) action as your twitch the bait.  Stick baits are also baits for open water or waters where the weeds have not reached the surface as they, like poppers, have treble hooks at the front and rear end.


Crawlers: The Jitterbug is the standard for crawling topwater baits.  The wide concave lip causes the bait have a side to side action accompanied by a "plop plop" sound that fish can't resist.  Simply cast it into open water or waters that have weeds below the surface and hold on.  Crawlers are great baits for night time, heavily overcast and rainy day fishing.

Propbaits:  Propbaits look similar to stickbaits with a more narrow profile and small propellors at each end. They're fished with twitches and frequent pauses that make props spin simulating feeding baitfish.  Like many others on the topwater list they are good for open water and water with below surface weeds.


Buzzbaits:  Buzzbaits are great baits for covering large amounts of water within a short time.  They have a large propellor like blade that throw a lot of water making the buzz sound across the surface. Retrieve them slowly and steadily as they sink when you stop reeling.  As well you want to retrieve the slowly in order to keep the bait in the strike zone longer avoiding missed strikes.


Topwater baits are a great choice for fishing as any fisherman will tell you.  However don't get drawn in to the belief that they are only a bass fishing bait because almost all fish will take bait off of the top you just have to chose what they want.  In fact my preferred method of fishing for panfish is with a small flyfishing popper or a foam spider.

Thanks for reading
Kwan


LinkWithin

Related Posts Plugin for WordPress, Blogger...