
Sunday, February 22, 2015
Thursday, January 29, 2015
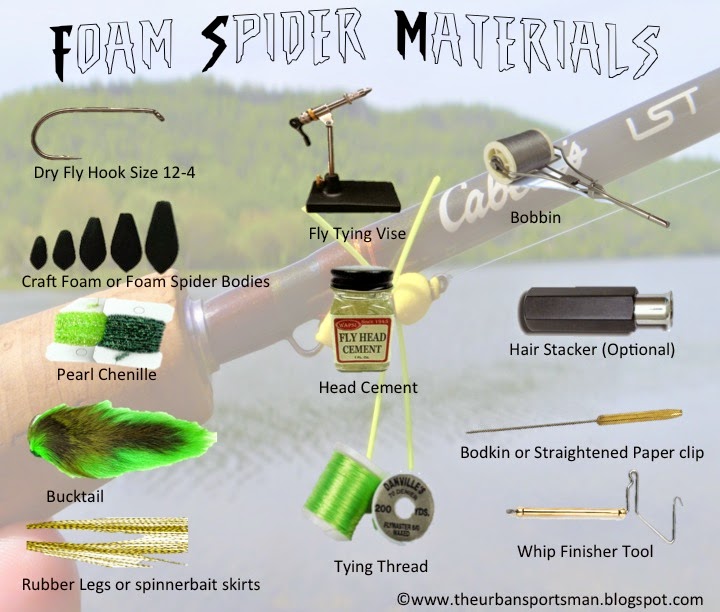
Bluegill Foam Spider Fly Breakdown

As well it's probably the best fly for young people to fish with because it's easy to cast as well bluegill will consistently chase this fly down and eat it. Casting the foam spider doesn't require any finesse or gentle touchdowns like casting dry flies for finicky trout. In fact a splat landing is just fine as it gets the attention of hungry panfish as well as bass looking for an easy meal.
Basically the foam spider imitates any terrestrial that has fallen into the water. However what I've noticed is that you can tie it in just about any color pattern but for some reason lighter bodies don't work as well and bee color patterns tend to work best right after a rain. All in all it's a great fly to have in your box especially if you plan on harassing the local bluegill population in your neck of the woods. As well this is a great starter fly for kids.
Tying Tips:
- Use the lightest thread you can get away with.
- Do not wrap an entire thread base as thread absorbs water and inhibits the fly's ability to float.
- Use as little pear chenille as you can, as the center thread of the chenille absorbs water inhibiting the fly's ability to float.
- If you find the fly is difficult to see in the water tie in a small foam bright colored indicator on the top.
Fishing tips:
- Let the fly splat down on to the water. This makes it seem like a bug that has fallen out of a tree.
- Give the initial ripples around the fly a chance to dissapate before moving the fly.
- Try short erratic retrieves and long retrieves to see what fish want.
- Use the lightest weight hook you can find. The less the weight the better it'll float.


Here is a great video tutorial of the foam spider that I tie all the time.
You may also Like:

Matching The Hatch: Wooly Bugger
Due to the simplicity and ease of use, the wooly bugger is probably the first fly every beginner learns to tie. Continue Reading Here!

For years fly fishermen and women have had one motto or truism when it comes to picking which fly to use next and that is "Match The Hatch". Continue Reading Here!

Fifteen Minutes to Jig Up Some Bluegill
Today I decided to sneak away during my 30 minute lunch to try out one of my hair jigs I'd tied this week. Continue Reading Here!
Tuesday, December 23, 2014
My Christmas Present to Myself

So this years trout opener I decided that it was high time I upgrade my mode of transportation from float tube to kayak. Don't get me wrong I love fishing from a float tube and have no thoughts of getting rid of the one I have right now. However I like the added mobility and comfort that a kayak will give me especially in those cooler early season times.
So what I decided to do was save my pennies and grab me a yak for next season. With the decision to get one came the decision of what to get. So I started reading every article about kayak fishing I could find and watching every youtube video available. So after absorbing every bit of kayak fishing information available by osmosis I realized what things would be important factors in making my decision.
1. Reliability was the number one thing I was looking for when checking out kayaks. From what I saw when reading reviews was that most kayaks were pretty good as far as the construction of the products. Even the complaints on every kayak I looked at were things that were pretty easy to write off as random unfortunate occurrences in which kayaks leaked or were damaged. Not only that but a lot of the negative reviews I saw were more a matter of personal preference than manufacturers defect. So with that I saw that for the most part reliability shouldn't be much of an issue if I take care of whatever kayak I get, not only that but there is always a chance for some random manufacturers defect. So no need to stress over what could randomly happen no matter what yak you get. I know you get what you pay for but I also know that no man made product is without imperfections.
2. Sit on top or sit inside. Well it didn't take too long for me to figure out I wanted a sit on top kayak. As when I started trying a few out I realized very quick that to me sit inside kayaks feel very confined which I don't care for all that much. Also I had to consider that while I've kayaked before it isn't exactly something I do regularly so there is a high likelihood that I'll be going for a swim at least once in this thing. With that in mind I know from summer camp experience that sit inside kayaks swamp if flipped (that's not to say that sit on top style yaks don't swamp cause they do) and can be a bit of a pain to flip back over and bail out if you take an unintended dip into the water. So sit on top it would be for me cause if I'm gonna be fishing from this thing from any large amount of time I want to be as comfortable as possible. And when I do take a dip I want to be able to get back on the kayak as easily as possible.
3. Size and weight were on my list of considerations. So when I say size I mean length and width of the yak. Length because length plays a part in overall speed of the yak as longer kayaks tend to be faster than shorter ones. Width because the wider the kayak the more stable the yak will be as well the wider the yak the more stable it will be if I get brave and attempt to stand and fish. However increased width creates more water resistance and slows the kayak. So when it came to length and width I was looking for a good balance. As for weight, this was actually more important to me than length and width. Simply because there are places I plan on fishing that don't have an actual dock to put in s I'll have to carry that yak to where ever I need to get. At least until I make myself a kayak cart. Not only that but I'll be the only person loading the yak on top of my truck whenever I go and if I find loading the kayak to be a pain odds are I just won't take it and I'll opt for the float tube.
A buddy of mine kept mentioning to me carrying capacity with my yak however this really wasn't a big deal for me since I don't weigh much myself and I personally like to fish in a minimalist fashion.
4. Price was the last of my considerations. Not because I have a lot of money to spare but because I have no problem delaying my gratification to save and get what I want. For that matter price wasn't really a big deal however my thought process was that this will be my first kayak so let's get something I can make some mistakes with and not break the bank since I know I'll be doing modifications to it.
With all of these things in mind I ended up picking the Bass Pro Shops Ascend FS12T (2012) fishing kayak as my Christmas present to myself. The kayak pretty much met all of my conditions and didn't break the bank which was perfect for me. Here are the specs on the yak.

Specs:
Length: 12' 0"
Width: 31"
Weight: 68 lbs
Weight Capacity:
Price: $499 (I paid $350 cause it was on clearance)
Rudder: No
Features:
Padded seat
Bow dry storage hatch
Open Cockpit Storage
Molded foot braces
2 flush mount rod hoders
1 Center mounted Scotty rod holder
Friday, November 14, 2014
9lb Smallmouth Bass On Video
I came across this youtube video and had to share it. This is by far the biggest smallmouth bass I've ever seen. This thing is a beast! Thanks for Planooutdoors on youtube for sharing this video.
Friday, September 12, 2014
Understanding the Different Types of Fishing Reels

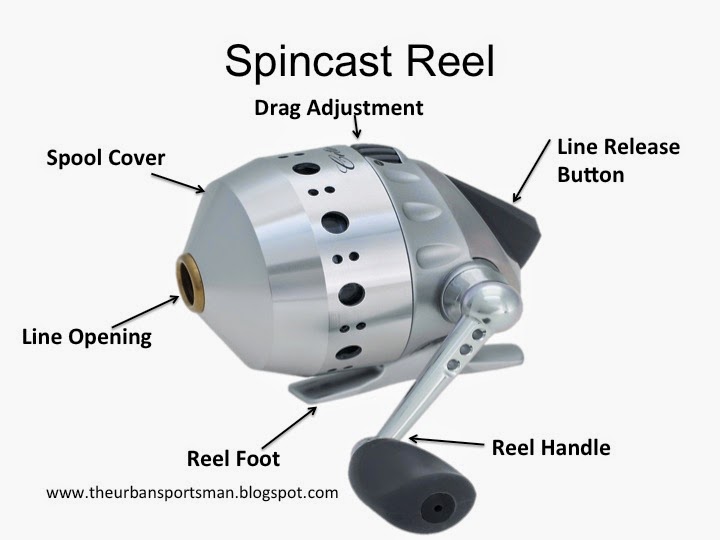
Which brings me to the pros and cons of the spincasting reel.
Pros: This reel is a great teaching tool for anyone learning how to fish as it is by far the easiest reel to use. As well the fact that it's inexpensive gives you the flexibility of starting a kid out in fishing without breaking the bank on a hobby they may eventually cast aside.
Cons: Unfortunately because spincasting reels tend to be considered entry level reels they're often not made for high intensity usage. As a result many, not all, spincasting reels are not very durable as they are made of inferior materials. As well this type of fishing reel is often not the best at long distance casting and suffers from a low hauling power which is needed for hauling big fish out of heavy cover like lilly pads and submerged vegetation.
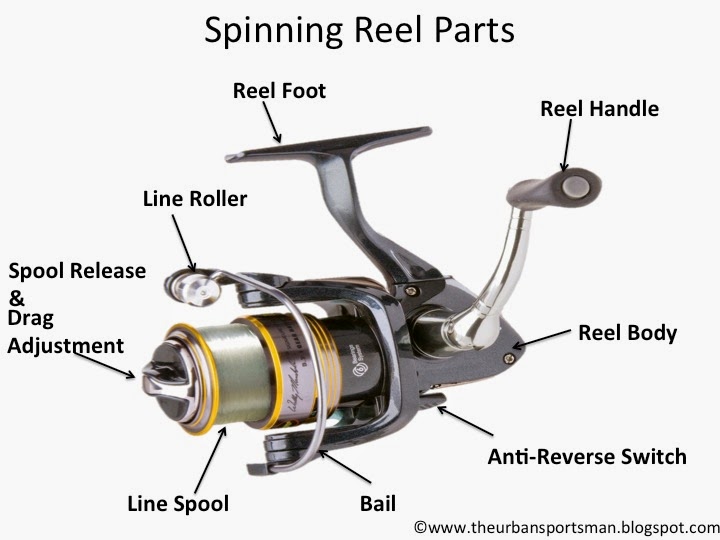
Most of my reels are spinning reels just because I'm a bit more comfortable using them and the fact that I can get a decent quality reel for a reasonable price. In addition I like the fact that reel maintenance is relatively simple for those times when I'm being my usual clumsy self and I drop a rod into the water while wading or on my float tube.
Quick Tip: When picking spinning reels I tend to opt for reels with front drag systems rather than rear drags. As the front drag has large washers that exert force on a flat surface which makes the front drag system smoother than the rear. Where as the rear drag pushes against the drive shaft of the reel which has a smaller surface area.
Pros: Overall the pros of using spinning reels are as follows.
1. You can get a decent spinning reel for a moderate price.
2. Due to their open spool design spinning reels tend to hold more line that the other reel types.
3. Spinning reels are relatively easy to use and are easy to learn to use.
4. They are great for casting long distances and are very accurate with practice.
5. Spinning reels are great reels when using light baits.
6. Not prone to birds nest.
Cons: The cons of spinning reels are as follows.
1. Spinning reels are prone to line twist unlike baitcasters which are prone to birds nest.
2. Spinning reels come in very limited gear ratios which limits your options for reel speeds.
3. Unfortunately spinning reels are not powerhouses like their baitcasting cousins. Because spinning reels actually wrap line on the stationary spool upon retrieval rather than the spool spinning hauling the line on like a wench, spinning reels are limited when it comes to hauling power.
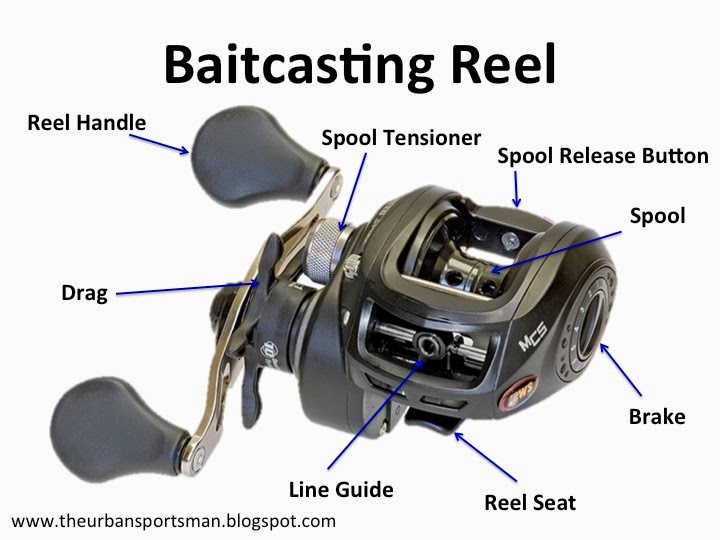
Baitcasting Reel
Baitcasting reels are quickly becoming just as widely used as spinning reels. Where in the past you mostly saw more experienced and pro anglers using baitcasting reels now there isn't a day that I'm out on my local pond harrassing the bass and there isn't at least one other person out there using a baitcaster.
This is because more and more people are recognizing the benefits of using a baitcaster.
Pros: The pros and cons of using baitcasting reels are as follows.
1. Baitcasting reels are wenches, of the different types of reels baitcasters have the most hauling power.
2. Baitcasters work very well with heavier baits.
3. Baitcasting reels offer many more gear ratios (retrieval speeds) so choosing the gear ratio that's more fitting for specific baits is far easier.
4. Baitcasting reels also have very smooth drag systems.
5. Baitcasting reels work great with heavier lines and super lines like braid.
Cons: The cons of using baitcasting reels are as follows.
1. Baitcasters are the most difficult reels to use easily getting birds nest on bad cast.
2. Because of the steep learning curve with baitcasters it takes a bit more practice to be able to make longer cast.
3. Baitcasters are not the best choice for lighter baits.
4. As said before baitcasters are prone to getting birds nests in the line upon casting if not thumbed correctly
5. Prices of bait casters can easily surpass a budget friendly place for the average person who doesn't fish that often.
Overall the different types of fishing reels are then to aid in different ways. No one reel type is better than the other however they all just have different purposes. As well with the technological progressions being made fishing reels are all being made with lighter and stronger materials as technology improves. So choose wisely when choosing your next fishing reel and enjoy it for all it's worth. Thanks for reading.
Thursday, July 24, 2014
Product Review: Matzuo Nano Kroaker Frog

.jpg) Company Description: The Matzuo Nano Kroaker Frog is the perfect floating bait for hard to reach bass. Fish this bait in lily pads, timber or any other heavy cover. The cupped mouth spits a large plume of water when popped. Offered in a variety of realistic finishes for nearly all conditions. This floating frog bait is a true trophy producer!
Company Description: The Matzuo Nano Kroaker Frog is the perfect floating bait for hard to reach bass. Fish this bait in lily pads, timber or any other heavy cover. The cupped mouth spits a large plume of water when popped. Offered in a variety of realistic finishes for nearly all conditions. This floating frog bait is a true trophy producer! Features Benefits: The Nano Kroaker Frog has a cupped mouth for better popping action as well as multi-strand legs and duel weedless black nickel Matzuo hooks. The Nano frog comes in both 2 inch (1/4 oz.) and 3.5 inch (5/8 oz) sizes to fit your desires. Finally the Nano Kroaker has a small disk at the base of the frogs body which weighs the rear end down for longer cast as well as keeps the rear portion of the bait below the head for a more realistic action on retrieval.
Review: Initially I fished this bait as is out of the box with no alterations. To say the least I was initially very happy with the bait as on the first cast a small 12 inch bass exploded from under some lily pads and inhaled it.
Honestly this was the case pretty often however what I learned pretty quickly was that this bait suffered
.jpg)
The second problem I noticed was that they hooks are bent in too deeply which didn't really make much of a difference with smaller bass that took the bait. However whenever I set the hook on larger bass because of the sharp bend on the hooks often I'd pull the bait out of the fishes mouth not getting a good hook set. That's not to say that the hooks aren't sharp, in fact the hooks are very nice especially given the lower price point of the Nano Kroaker Frog.
Lastly one unique thing that happens with this frog, not sure if I want to call it a problem just yet, is that due to the weighted disc in the rear of the body this frog sinks below the surface. While this flaw is something I'm sure the people at Matzuo didn't intend to have it actually didn't stop bass from attacking
this bait. In fact I've caught at least ten bass that attacked this frog while it was swimming below the surface. Overall I give this bait a 4 stars because of the lack of floating and minor tuning issues out of the package and the fact that the cupped mouth really doesn't add much popping sound to the retrieve.
 Pros: The best thing about this frog is that when fish are not really interested in eating bigger frogs the Nano Kroaker Frog draws them through the muck. As well with the weighted disk in the rear of the bait it imparts a great life like action with the flick of a wrist.
Cons: First the legs, like on other frogs on the market, are too long out of the package which often leads to missed fish because they grab the legs rather than the body of the bait. As well the nickel hooks are angled too deeply over the body which has led to several lost larger bass due to inability to set the hook. Lastly the same weighted disk which aids in casting and imparts great action, causes the bait to sink rather than float as designed.
Price: $3.49 - $3.99
Saturday, May 24, 2014
How to Maintain Your Baitcaster Reel "Video"

Yet again I've come across a great video on youtube that gives a tutorial on disassembling and maintaining baitcasting fishing reels. The two videos were made by TackleJunky81.
Subscribe to:
Posts (Atom)